Introduction
Making your own candles at home can be a very enjoyable and therapeutic activity. Not only that, but it offers you great benefits like making your own unique scent combinations to enjoy any time. Even if you’re a beginner, the process of candle making is relatively easy and inexpensive. Plus, you can customize each batch with unique colors, textures, and shapes however you want. Making candles at home is also an environmentally friendly way to add some ambiance to your space without wasting resources. With these benefits in mind, let’s take a look at how to get started with making homemade candles from the comfort of your own home!
Materials Needed
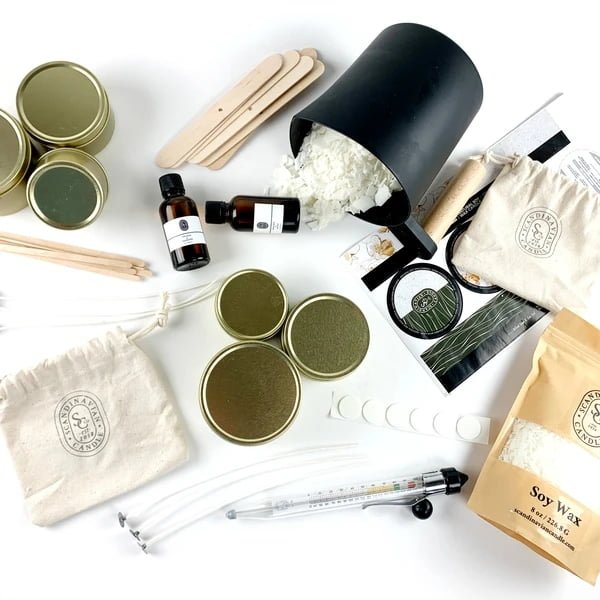
Making candles is an enjoyable and easy home craft that can be done by anyone from a beginner to a professional crafter. To get started, you will need some essential supplies for candle making. Some of the most important items include wax, wicks, containers, molds, dye chips, fragrances or essential oils, a thermometer, and perhaps a double boiler.
Wax is one of the main components of making a candle. There are many types of wax available for candle making ranging from paraffin to soy wax flakes. Paraffin has several benefits for beginners such as lower cost and improved scent throw when compared to other waxes. Soy wax flakes are probably best suited for those looking to produce more eco-friendly candles.
After purchasing the wax, it is important to purchase or source wicking material as well. Wicks come in various sizes designed specifically for different container sizes or even floating candles. Self-trimming wicks or pre-tabbed strips are ideal for beginners because they are much easier to work with than their traditional counterpart. When choosing wicks it is also important keep in mind factors such as type of wax and diameter of the container being used in order to provide proper heat management during burning.
The next item on the list is containers or molds which simply provide support for your candle and are available in just about any shape imaginable including jars and tins, tealight holders, votive molds and floating discs as well as many others. These items will likely depend on what type of candle you want to make so be sure to choose something that accommodates your desired product size and shape properly.
Dye chips will allow you to customize your candles in ways limited only by your imagination with many vibrant colors available on the market today! Similarly you may incorporate fragrance into your creations using essential oils or premade scents designed specifically for use in candles if so desired (although some users may experience discoloration). Lastly you should consider acquiring a thermometer which would prove invaluable in monitoring both melting temperatures (ideally around 120°F) as well as cooling temperatures (around 90°F). A double boiler is also recommended but not absolutely necessary when melting the wax safely over indirect heat sources such as hot water baths or heated pouring pots found at most craft stores nationwide.
Preparation
Before melting your wax for candle making, it is important to properly prepare the area you are working in. Ensure that all materials you will be using for candle making are gathered and close by including wax, wicks, containers, a double boiler or crockpot, thermometer, and any desired scents or dyes. Once everything is set up within easy reach, it is time to start melting.
When melting wax it is important to choose the right apparatus. This depends on the type of wax being used and the desired results. For instance, beeswax and paraffin require a double-boiler or crockpot whereas soy wax has a relatively low melting point so can typically just be melted directly in a pot on a stove top. There are other options out there suited to various different types of waxes such as microwave safe containers and/or specific melters that provide more even and consistent temperatures.
Once you have melted your chosen wax it is time to mix any colourants or fragrances that you may wish to add into it. When adding scent always remember start with a small amount; usually no more than 6-8% of the total wax weight. If you decide afterwards that you would like your candles more fragrant simply wait for the mixture to cool down before re-melting and adding more in stages until desired potency has been achieved. For colouring candles using dye chips rather subtle results are usually achieved; usually no brighter than pastel tones which should make approximately 1 -3% of total weight when added in one go depending on the depth of colour required; again less is always best when first experimenting as too much might overpower your scent choice or alter desirable characteristics such as burning time etc., so should be added with caution if excess needed later on can potentially still be adjusted accordingly.
Making the Wick
When it comes to making the wick for a candle, choosing the right size and length is essential. It affects the way that the flame burns, its performance, and more. The width of the wick should be relative to the diameter of the container being used so that it does not extinguish itself quickly as smaller containers will require thinner wicks if too thick a one is used. When deciding on length, there are also certain considerations to keep in mind. For starters, shorter wicks may provide a shorter burn time and may result in decreased scent throw or a tunneling effect (caused by an uneven burn). Longer wicks can help solve these problems but they must be secured properly; otherwise they risk leaning off-center during burning. This can be accomplished by wrapping some of the remaining end of your cut wick around an object or secure it with hot wax by dipping it into prepared melted wax to make sure that it stays straight and centered while burning.
Adding Fragrance and Color
Making candles can be both a fun and creative hobby, or even a viable business venture, depending on how you want to use your finished product. However, when it comes to adding the finishing touches of scent and color to your candle, it is important not to rush through the process. Adding too much fragrance or color can result in a less desirable outcome. Generally, it is recommended that you add no more than 10% of fragrance oil or wax dye for a standard container candle.
When testing different fragrances for your candles, start off slow by choosing one you think could blend nicely with the others you plan on adding. This allows you to experiment and play around with scents until you find something that works best for your desired outcome. Additionally, when deciding on which type of wax dyes to use, many people prefer liquid because it gives off more vivid colors and blends faster into the mixture. The key here is always to start off lightly in order to avoid having overpowering scents or colors in the finished product. Once satisfied with the scent and color desired, sample the candle once more before allowing it to dry completely and set aside so that all ingredients are firmly incorporated into its makeup!
Pouring the Candle
As a beginner in candle making, pouring your wax can be one of the most intimidating processes. After all, you want to make sure your candles look as even and professional as possible. Fortunately, learning how to create an even layer of wax when pouring your candles is not complicated.
The first step is to heat up the wax until it reaches a temperature that is ideal for pouring – this temperature will depend on the type and brand of wax you are using, so refer to the manufacturer’s guidelines for this. To prevent air bubbles from forming, it may be beneficial to use an immersible blender before you pour. Once your mixture has been heated and blended, it is time to actually begin pouring.
A key point to remember while pouring is that doing too quickly can cause air pockets in the poured layer; conversely, too slow of a pour can lead to uneven ends or dripping along the sides of your container or moulds. To achieve an even layer of wax, start with short pours around 1-2 inches above the mold piece by piece or one entire pour slowly bringing it down onto the mould as close as possible without touching in order for an even coating and finish line at eye level for perfect results. If desired, keep a pot holder in hand during this process so you can hold your mould steady while gently shaking it from side-to-side if needed to spread out any pooling wax between each pour until finished. Allow enough time for these layers to completely cool before beginning the next layer!
Finishing
Once the candle has completely cooled, trim the wick to about ¼ inch above the wax. This will help to prevent any smoking because the wick is no longer too long. If you are going to reuse the mold, wait until room temperature before attempting to remove it. Then gently pop out the container candles and cut away excess wax on container edges with a sharp knife or razor blade before discarding it. For pillar candles, wait until room temperature or use a heating tool such as a hair dryer or heat gun for easier dismantling of molds. Place pillar candles on an even surface before cutting away any excess wax from around the bottom and sides with a sharp knife or razor blade before discarding it. Finally, add decorative touches like ribbons, tags and other embellishments — whatever your heart desires.
Maintenance and Care
Once you start making candles, it’s important to follow a few simple steps in order to maintain and care for your products. For starters, make sure to keep all of your tools and supplies clean and organized in order to avoid any contamination or misplacement. When actually making the candles, be mindful of where you are working, striving for a location free of animals, chalky surfaces and other environmental factors that could ruin the output. Additionally, try and keep the temperature regulated at all times during production; sudden shifts can influence the formation of bubbles in wax. During set-up and clean-up stages it is crucial to use caution when handling hot surfaces; an oven mitt or extra layer can mean all the difference between keeping fingers out of harm’s way or having to treat a burn. Finally, once you have finished making your candles they should be stored away in a cool area where they won’t melt or become malformed – this will ensure that the final product looks professional. Following these simple maintenance tips will create beautiful pieces while also saving time spent needing to redo projects due to mistakes made along the way!
Final Thoughts
Candle making can be a fun and easy hobby for beginners looking to explore the world of crafts. It involves simple steps that are easy to follow, plus it can be quite rewarding, knowing you are creating something with your own two hands. Not only is it a great way to connect with nature in an artistic way, but it can also make great gifts for family and friends. Candle making is a creative pastime that encourages creative expression as well as growth. With all the different scents, colors and styles available, you can create unique candles to suit any preference or occasion. Furthermore, candle making requires minimal materials and doesn’t require much prior knowledge other then some simple steps that don’t need to be overly complex. All in all, candle making is a fun and easy hobby for beginners because it can bring out one’s creativity while also providing satisfaction when the finished product has been made.

Welcome to my candle making blog! In this blog, I will be sharing my tips and tricks for making candles. I will also be sharing some of my favorite recipes.


