Candle making is a beautiful craft that allows for endless creativity and personal expression. However, it can also be a delicate process that requires precise temperature control in order to achieve the perfect consistency and texture for your candles. That’s where a double boiler comes in.
Using a double boiler for candle making offers several benefits that make it an essential tool for any candle maker. Firstly, it helps to prevent overheating of the wax, which can result in discoloration and degradation of fragrance oils. By providing a gentle and indirect heat source, a double boiler ensures that the wax melts evenly without reaching temperatures that could affect its quality.
Secondly, a double boiler helps to prevent uneven heating in the wax. This is particularly important when using natural waxes, such as soy or beeswax, which are more sensitive to heat fluctuations. The water bath in the bottom pot provides a buffer between the direct heat source and the melting wax, ensuring consistent and controlled heating throughout the process.
By using a double boiler for candle making, you can have peace of mind knowing that your wax is melting at just the right temperature without any risk of scorching or burning. It’s an indispensable tool for achieving professional-looking candles with smooth textures and optimal fragrance throw. In the following sections, we will delve into what exactly a double boiler is, how it works, and all the steps involved in using one effectively for candle making.
What is a Double Boiler and How Does it Work?
A double boiler is a kitchen tool that consists of two pots stacked on top of each other, with the bottom pot filled with water and the top pot holding the wax or other ingredients to be melted. The heat from the boiling water in the bottom pot gently and evenly heats the contents in the top pot, preventing them from coming into direct contact with direct heat source.
The main purpose of using a double boiler for candle making is to ensure that the wax is melted slowly and evenly. This gradual heating process helps prevent any hot spots or overheating that could lead to discoloration, burning or degradation of the fragrance oils, or even potential fire hazards.
In addition, using a double boiler also provides a good level of temperature control during the melting process. Since the boiling water at the bottom generates consistent heat, it allows for more precise temperature management when melting different types of waxes or adding colorants and fragrances. This is especially important as certain types of waxes have different melting points, and overheating can affect their texture and overall quality.
Overall, a double boiler creates a gentle and controlled environment for melting wax, ensuring that it reaches its desired consistency without any potential damage. It is an essential tool for candle makers who prioritize safety, efficiency, and achieving high-quality final products.
Table: Comparison of Different Methods for Heating Wax
| Method | Description | Advantages | Disadvantages |
|---|---|---|---|
| Double Boiler | A method where two pots are stacked on top of each other; water in the bottom pot heats up the ingredients in the top pot. | – Prevents overheating
| – Requires additional equipment (double boiler)
|
| Microwave | Using a microwave oven to melt the wax directly in a microwave-safe container. | – Quick and convenient
| – Potential uneven heating
|
| Stove Top | Directly heating the wax on a stove burner using a heat-resistant container. | – Faster than using a double boiler
| – Risk of hot spots and uneven heating
|
Choosing the Right Double Boiler for Candle Making
When it comes to candle making, choosing the right double boiler is essential. The double boiler you select can greatly impact the quality and consistency of your candles. There are different types of double boilers available in the market, each with its own set of advantages and disadvantages. In this section, we will explore the factors to consider when selecting a double boiler for candle making and compare different options.
Types of Double Boilers
There are two main types of double boilers commonly used in candle making: stainless steel and glass. Stainless steel double boilers are durable, easy to clean, and can withstand high temperatures without warping or cracking. Glass double boilers, on the other hand, allow you to see the melting process clearly and are non-reactive, ensuring that there is no interference with the fragrance or color of your wax.
Factors to Consider
When choosing a double boiler for candle making, there are several factors to consider. First, think about the size of your batch. If you typically make large batches of candles, a larger capacity double boiler would be more suitable. Additionally, consider the type of stove you have – if you have an induction stove, make sure to choose a double boiler that is compatible with induction heating.
Comparison of Different Options
Let’s take a closer look at some popular options in each category:
- Stainless Steel Double Boiler: This type is often preferred for its durability and efficiency. The Candlemaker’s Store Stainless Steel Double Boiler is a highly recommended option that comes in various sizes to suit different batch sizes.
- Glass Double Boiler: For those who prefer visibility during the melting process, the HSTYAIG Borosilicate Glass Double Boiler is an excellent choice. It features heat-resistant borosilicate glass that can withstand high temperatures without breaking.
Pros and Cons
Stainless steel double boilers are known for their durability but may not offer clear visibility during the melting process. On the other hand, glass double boilers allow you to monitor the melting process but may not be as durable. Consider your specific needs and preferences when deciding between these options.
When it comes to selecting the right double boiler for candle making, take into account factors such as batch size, stove compatibility, and material preferences. Remember, finding the perfect double boiler is an important step towards achieving consistent and high-quality candles.
Preparing the Double Boiler for Candle Making
Setting up a double boiler correctly is crucial for efficient and safe candle making. By following a few simple steps, you can ensure that your double boiler is prepared properly and ready to melt your wax. Here is a step-by-step guide on how to prepare the double boiler for candle making:
- Gather the necessary equipment: Before setting up the double boiler, make sure you have all the required equipment on hand. You will need a heat-resistant container or pouring pot to hold your wax, a larger pot or saucepan to serve as the bottom of the double boiler, water, and a stove or heat source.
- Fill the bottom pot with water: Take your larger pot or saucepan and fill it with an adequate amount of water. Ensure that the water level is enough to create steam but not too high that it touches the bottom of your pouring pot.
- Place pouring pot in the double boiler: Once you have filled the bottom pot with water, carefully place your pouring pot on top. Make sure it sits securely without tipping over.
- Heat and monitor: Turn on the heat source and gradually increase the temperature to start heating both pots. Keep a close eye on the process to prevent overheating or boiling of the water.
- Check for stability: Throughout the heating process, check that both pots are stable and secure in their positions. This will help prevent accidents such as spills or tip-overs.
- Adjust water level if necessary: If you notice that your water level has significantly decreased during heating, add more hot water to maintain an adequate amount in the bottom pot.
By properly preparing your double boiler for candle making, you can ensure even and controlled heating of your wax without any risk of scorching or overheating. It is essential to remember that safety should always be a priority when working with heat sources and hot materials.
| Equipment | Safety Precautions |
|---|---|
| Heat-resistant container or pouring pot | Handle with oven mitts or gloves to prevent burns. |
| Larger pot or saucepan | Use a pot holder or handle cover to protect your hands from heat. |
| Water | Avoid splashing water onto the stove or heat source. |
Melting the Wax in the Double Boiler
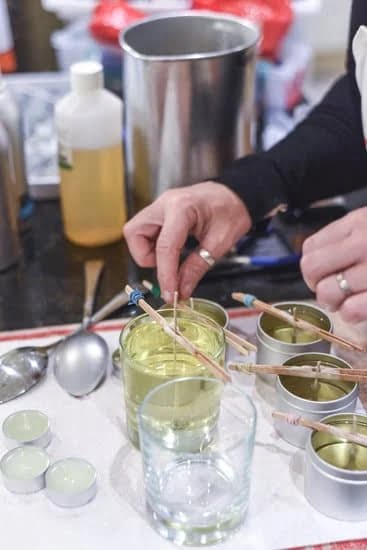
Once you have set up your double boiler for candle making, it’s time to start melting the wax. Melting the wax properly is crucial in achieving high-quality candles that burn evenly and have a smooth finish. Here are some techniques and tips for melting wax using a double boiler.
First, ensure that the water in the bottom pot of your double boiler is simmering gently. You want a steady and consistent heat, but not boiling water as it can cause hot spots and overheating of the wax. Place your pre-measured chunks or pellets of wax into the top pot of the double boiler. It’s important to measure your wax accurately to avoid any issues with fragrance and color proportions later on.
As the wax starts to melt, you can stir it occasionally with a wooden spoon or silicone spatula. Stirring helps to distribute heat evenly throughout the wax and promotes faster melting. Be cautious not to over-stir, as this can introduce air bubbles into the wax, which may affect its final appearance.
It is crucial to monitor and maintain an appropriate temperature range while melting different types of waxes. The ideal temperature for most waxes used in candle making ranges between 160°F (71°C) to 185°F (85°C). However, certain specialty waxes may have specific melting points, so always refer to your specific product’s instructions.
Additionally, be mindful of any additives or fragrances that need to be added at specific temperatures during the melting process. Some fragrances may have flashpoints which could ignite if added at too high temperatures. To avoid this, remove the top pot from heat once the wax has melted completely but still retains some residual heat before adding any fragrance oils or colorants.
By following these techniques and being attentive to temperature control during melting, you will achieve optimal results when using a double boiler for candle making. This method ensures that your wax is heated gently and evenly, allowing for a more efficient and safe candle-making process.
Adding Fragrance and Color to the Melted Wax
Adding fragrance and color to the melted wax is an important step in candle making that allows for customization and personalization. It enhances the aesthetic appeal of the candles and adds a delightful scent to enhance the ambiance when they are lit. Here is a step-by-step guide on how to incorporate fragrance oils and colorants into the melted wax:
- Gather your materials: Before you begin, make sure you have all the necessary materials at hand. This includes your chosen fragrance oil, candle dye or colorant, measuring spoons or droppers for accurate measurements, and stirring utensils.
- Determine the desired intensity: Decide on the desired intensity of fragrance and color for your candles. The recommended proportion is usually 1 ounce of fragrance oil per pound of wax, although this can vary depending on personal preference.
- Add fragrance oil: Once your wax has completely melted in the double boiler, remove it from heat and let it cool slightly (around 150-160°F). Measure and add the appropriate amount of fragrance oil to the wax according to your chosen proportion.
- Incorporate color: If you want colored candles, add a suitable candle dye or colorant to achieve your desired shade. Start with a small amount as a little goes a long way, especially with concentrated dyes. Mix well until the color is evenly dispersed throughout the wax.
- Stir gently: Using a stirring utensil such as a wooden dowel or spoon, gently stir the melted wax to ensure proper blending of fragrance oil and colorant. Be careful not to introduce any air bubbles during this process.
- Test and adjust: Before pouring into molds, it’s always recommended to do a test burn with a small amount of colored and fragranced wax first. This allows you to assess if any adjustments are needed in terms of scent throw or color saturation.
Remember, it’s important not to overdo it with fragrance oils or dyes to prevent any performance issues with your candles. Experimenting with different fragrance and color combinations can be a fun part of the candle-making process, but it’s essential to start with recommended proportions and make adjustments according to personal preferences. With practice, you’ll find the perfect balance to create beautifully scented and colored candles using your double boiler setup.
Pouring the Melted Wax into Candle Molds
Once the wax has been melted and properly blended with fragrance and color, it is time to pour it into candle molds. This step is crucial as it determines the shape and appearance of the final candles. By following some simple techniques, you can achieve clean and precise pours, ensuring that your candles turn out beautifully.
Step-by-Step Guide for Pouring the Melted Wax
- Prepare the Candle Molds: Before pouring the wax, ensure that your candle molds are clean, dry, and ready for use. If using silicone or rubber molds, a quick spray of mold release agent can help in easier removal of candles later on.
- Secure the Wick: Place a wick in each mold, making sure it is centered and straight. You can use a wick sustainer or glue dot at the bottom of the mold to hold the wick in place.
- Slowly Pour the Wax: Using a ladle or heat-resistant pitcher, slowly pour the melted wax into each mold. Start by filling them partially, leaving a small amount of space at the top.
- Tap and Settle: Gently tap or wiggle each mold to release any air bubbles trapped within the wax. This helps in achieving an even texture and eliminates any voids.
- Top Off if Necessary: As the wax settles during cooling, there may be slight shrinkage or hollow areas forming on top of the candles. To avoid this, keep some extra melted wax handy to top off each candle after they have cooled for about 15 minutes.
- Allow to Cool Completely: Let the candles sit undisturbed until they have cooled completely and hardened. This usually takes several hours, depending on factors such as room temperature and size of candles.
Achieving Clean and Precise Pours
- Maintain Steady Hands: To avoid spills or uneven pouring, it is important to hold the ladle or pitcher steadily while pouring the wax. Practice makes perfect, so take your time and focus on achieving smooth and controlled movements.
- Use a Pouring Funnel: If you have difficulty pouring directly into small molds, consider using a pouring funnel. This can help in directing the flow of wax more precisely and preventing any accidental spills or drips.
- Work in Small Batches: If you are making multiple candles, it is best to work in small batches rather than attempting to pour all of them at once. This allows for better control and helps in maintaining consistent pour temperatures.
By following these steps and implementing these techniques, you can ensure that your candles are poured with precision and care. Once the wax has hardened completely, you can proceed to release the candles from their molds, trim the wicks if necessary, and enjoy the fruits of your candle-making labor.
Cleaning and Maintenance of the Double Boiler
To ensure the longevity and functionality of your double boiler, it is important to properly clean and maintain it after each use. By following a few simple steps, you can keep your double boiler in excellent condition for many candle making sessions to come.
- Clean the Exterior: Start by wiping down the exterior of the double boiler with a damp cloth or sponge. This will remove any spilled wax or residue that may have accumulated during the melting process. Make sure to dry it thoroughly before proceeding to the next step.
- Hand Wash the Inner Boiler: The inner pot of the double boiler should be hand washed using warm, soapy water. Gently scrub away any remaining wax with a soft brush or sponge. Avoid using abrasive cleaners or steel wool, as they can damage the surface of the pot.
- Rinse Thoroughly: After washing, rinse the inner pot under warm water to remove any soap residue. Ensure that all traces of soap are thoroughly rinsed off before drying.
- Dry Completely: Once cleaned and rinsed, allow both parts of the double boiler to air dry completely before storing them away. It’s important to make sure there is no moisture left behind, as this can lead to rust or corrosion over time.
- Store Properly: For ideal maintenance, store your double boiler in a cool, dry place away from direct sunlight and heat sources. Consider keeping it in its original box or cover it with a clean cloth to protect it from dust and debris.
Safety Precautions:
- Always handle your double boiler with care while cleaning and drying.
- Avoid placing hot parts directly under cold water as sudden temperature changes may cause thermal shock.
- If there are stubborn stains on your double boiler, try soaking it in warm soapy water for a longer period or using a natural cleaner like vinegar or baking soda.
- Regularly inspect your double boiler for any signs of damage or wear and tear. Replace any parts that are cracked, dented, or warped.
- Remember to follow the manufacturer’s instructions for your specific double boiler model.
By taking the time to clean and maintain your double boiler properly, you can ensure its longevity and continue to enjoy the convenience it provides for all your candle making endeavors.
Conclusion
In conclusion, using a double boiler for candle making offers numerous benefits and advantages. It provides a safe and efficient way to melt wax without the risk of overheating or uneven heating. By utilizing a double boiler, candle makers can have more control over the temperature, resulting in consistent and high-quality candles.
Throughout this article, we have discussed what a double boiler is and how it works, as well as the various types available in the market. We have also provided step-by-step instructions on preparing the double boiler, melting the wax, adding fragrance and color, pouring into molds, and cleaning and maintaining the double boiler.
By following these guidelines and paying attention to detail, readers can confidently master candle making using a double boiler. Don’t be afraid to experiment with different techniques and ingredients to create unique and personalized candles. The art of candle making is truly an expression of creativity and imagination.
So go ahead, embrace the convenience and control that a double boiler brings to candle making. Create beautiful scented candles that will bring joy and warmth to any space. With practice, dedication, and an adventurous spirit, you can become an expert in this craft. So grab your double boiler and let your creativity shine.
Frequently Asked Questions
Can I put a candle in a double boiler?
It is not recommended to put a candle directly in a double boiler. A double boiler is typically used for gently heating and melting ingredients, such as wax or chocolate, without burning them.
If you were to place a candle in a double boiler, the flame would be smothered by the surrounding water, making it difficult for the candle to burn properly. Additionally, the heat from the boiling water may cause the candle to melt unevenly or even result in its container breaking due to sudden temperature changes.
Do I need a double boiler for candle making?
While using a double boiler can be helpful for certain aspects of candle making, it is not an absolute requirement. The main purpose of a double boiler in candle making is to melt and heat the wax slowly and evenly, reducing the risk of scorching or burning it. However, there are alternative methods that can achieve similar results without a dedicated double boiler.
For instance, you can use a heat-resistant container placed within a larger pot filled with water on low heat. This indirect method allows for controlled melting of the wax while still providing a buffer between direct heat and the wax.
How do you make a double boiler for melting candle wax?
To create a makeshift double boiler for melting candle wax, you will need two different-sized pots. First, choose a smaller pot that fits comfortably inside another pot without touching its bottom surface – this will act as your inner container where you’ll pour your wax. Fill the larger pot with water about one-third full and place it on your stove over low-medium heat.
Once the water starts simmering gently, carefully set your smaller pot inside it so that it sits securely but stays above water level. Now you can add your chunks or pellets of candle wax into the smaller pot, allowing them to gradually melt as they’re heated by the steam generated from boiling water below. Remember to stir occasionally until all the wax has melted completely before proceeding with your candle-making process.

Welcome to my candle making blog! In this blog, I will be sharing my tips and tricks for making candles. I will also be sharing some of my favorite recipes.


