Introduction
Making beeswax candles at home has become increasingly popular due to numerous benefits.Bee’s wax is natural, non-toxic, and contains honey’s distinctive scent. These elements together create an exquisite experience when lighting the candle. Additionally, bee’s wax has a longer burn time than other forms of wax–lasting up to 4x longer.
Making your own beeswax candles is a great way to exercise creativity and customize it for your own living space. You can express yourself by changing up the shape, size, color or scent added to the candle wick–and even make multiple variants such as adding decorations such as stones, dried flowers or glass crystals. Aside from being enjoyable and creative it also helps reduce waste by eliminating single-use plastic containers that many store bought candles come with.When making them at home you must be vigilant about following safety recommendations–candle making can be dangerous if not handled properly––but once all proper protocols are put in place, you can start crafting uniquely designed and fragranced candles in no time. Lastly, beeswax is affordable so you have flexibility when tinkering around the based design concepts of your homemade beeswax creation!
Materials & Tools Needed
Materials:
– Beeswax pellet or beeswax block: The beeswax is the key ingredient for making candles. It can be in the form of pellets (which are commonly used in candle-making) or a block of wax which can easily be cut into chunks with a knife.
– Wicks & tabs: These are used to assemble the candles and are made of a cotton braid. Don’t forget to get some wick base tabs so that you can secure the wicks in place before pouring your wax.
– Wick holder: Useful when you need to keep the wicks straight while you are assembling the candles.
– Essential oils (optional): You can use essential oils like Lavender, Lemon, and Clove to create your own unique scented candles.
Tools:
– Measuring cup and spoon set: Used for measuring out the correct amount of melted wax you will need for each candle.
– Double Boiler/Saucepan Set up: To melt the wax without burning it, use a double boiler setup where you place a heatproof bowl over a saucepan filled with water (or put water in the double boiler itself).
– Pot holders: Always have pot holders on hand when melting your wax as it will become hot during this process!
– Ladle or spoon: For transferring hot wax from one container to another.
– Candle mold containers: Choose heat resistant glassware pieces like mason jars, teacups, cans, or even make silicone molds yourself! Just remember that if using glassware directly pour your molten wax in at no more than 110 degrees Fahrenheit or else it may crack under temperature changes.
– Thermometer (optional): This helps ensure that you’re not too hot when pouring your melted wax into molds which could otherwise cause cracking glassware or bubbles due to sudden temperature changes.
Safety Instructions
It is essential to take safety precautions while making beeswax candles at home, as materials such as hot wax and a flame can be hazardous. Before beginning any candle-making activity, it is important to read the instructions carefully to familiarize yourself with the materials and tools required.
When setting up the work station, make sure that it is in an open space where children and animals are unable to reach it. It is also recommended to use protective gear such as oven gloves, safety glasses, and long sleeve shirts when working with hot wax or a flame. Ensure that all of your supplies are secured so that they do not fall over, since spilled wax can cause slippery surfaces and be highly flammable.
Candle wicks should always be tested before using them by dipping them into melted wax and checking how well they stay lit when lit. Make sure that you keep the heat source away from anything flammable such as paper or fabrics. To avoid possible burns, do not handle hot cooled beeswax for at least fifteen minutes after melting it.
Once finished making candles, allow them to fully cool before wrapping them or storing them away in an airtight container. Before you light the candle for the first time, trim the wick so it is no longer than half an inch long, which will help maintain even burning duration and keep smoke production low. It is also highly advised never to leave a burning candle unattended.
Step-by-Step Guide
Step 1: Prepare the materials for making candles. Gather your beeswax, wicks, mold or container to hold the wax, a double boiler (a pot filled with water and an insert pot to hold the wax underneath it), and safety gear like nitrile gloves or tongs.
Step 2: Take the double boiler apart and place the insert pot inside filled with beeswax. Heat up the double boiler over medium heat until all of the beeswax is melted. If you cannot use a double boiler, then you can melt the beeswax in a microwave-safe bowl and put it in intervals as needed in order to avoid burning it.
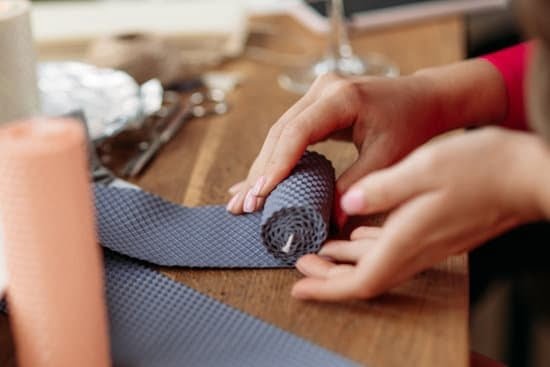
Step 3: Once all of the beeswax has been melted, you can begin making your wicks. Use pieces of cotton string or pre-made wicks available at craft stores to make your wicks. Simply dip the string into melted wax several times and use clips to secure them onto an empty tin can or something else similar that is tall enough for your mold or container so it does not touch the sides when dipping into melted wax. Make sure your wicks are pulled tightly before fastening them in place. Note: You may need to adjust how much wax each wick absorbs depending on how large each candle will be.
Step 4: Place your prepared molds or containers under each wick so that they are suspended directly above where you will pour your melted wax at least 0.5 inches away from walls on every side for better results in terms of air ventilation.
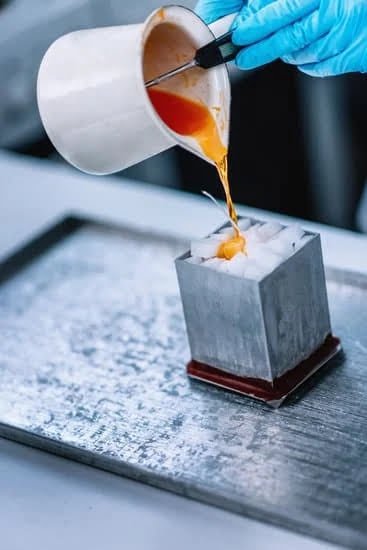
Step 5: Begin pouring small amounts ofbeeswax into each mold/container, allowing time for some parts to solidify before continuing so that no air bubbles are left inside while pouring – this process is called ’primary pouring’; repeat this process several times if necessary until desired thickness is achieved (about ¼ inch).
Step 6: Allow candles to cool off completely before proceeding; once cool, carefully remove all excess hardened wax around also known as ‘trimming’ – this increases airflow throughout all parts promoting even burning without spilling over; trimming also improves aesthetics, making sure all sides are level with one another ensuring fixed weight per candle too 全文拔…[3]
Decorating & Styling Tips
Creating beautiful and stylish homemade beeswax candles can be a fun and rewarding task. Once you have created some beautiful candles from pure beeswax, the next step is to style and decorate them. To make your beeswax candle stand out from the rest there are plenty of styling tips that you can use.
Consider starting by choosing a unique containers for your leaves that are made of either pottery or glass allowing light to shine through as this will enhance its beauty when lit. You could also try adding colored glass beads and glitter around the circumference of your wax container before adding the wax and wicks. This will add texture and sparkle to your candle while it’s burning, infusing it with a gorgeous ambiance.
Another option is to carefully cut revealing patterns into the sides of the wax after it sets in order to give it a distressed shape or look like crystals in play. You could consider dying your wax too using powdered pigments mixed with an emulsifier, but take care not put too much colorant or else you may over power the gentle fragrance of beeswax itself.
Organic plants also work great as decorative elements in homemade beeswax candles; now this type of decoration isn’t just limited to jarred candles either! The addition of real petals and leaves embedded inside can turn any candle into an individual piece of artwork with nature serving as its painter’s brush! Some leaves should preserve their vibrant vitality after burning however; only dried herbs can be considered safe for use in this project due to their fire resistant properties so choose wisely!
Finally, adding fragrances like essential oils, natural extracts, or even dried flowers enhances any bee’s wax candle design making them perfect for use as centerpieces on tablescapes during special occasions like weddings or anniversaries.
When displaying finished pieces that make use of organic materials remember not to leave near large windows when exposed direct sunlight threatens compromising fresh blooms exposed in softer beeswax melt circles or small shells filled with floral petals nestled around pillar wicks! A good practice is always to put them away till they’re ready for display – awaiting a special moment when they can be released back into their new admirers’ arms in full blazing glory!
Troubleshooting with Expert Advice
One of the most common issues when making beeswax candles at home is the wick not burning properly. This could be caused by a number of factors, including improper fit of the wick size to the candle diameter, or even an under-sized wick for the desired height and/or burn time you require from your candle. As such, it’s important to choose a wick that is best suited for the particular kind of candle you are making. Additionally, if your wick won’t stay lit, it may be because it’s too small for your candle and needs to have its tip burned off before lighting. Another helpful suggestion is to encase your wick in metal or use a reinforced tabbed bottom to keep it centered in place while burning.
In terms of troubleshooting a candle that begins to tunnel or shrink as it burns, this issue can usually be fixed with one of two approaches. The first option is to increase the amount of oxygen being introduced into the top of your candle while cooling so that all parts heat evenly. You could also reduce heat by leaving as much space between each pour as needed and cooling slowly depending on your local humidity levels and wax type used, as some waxes require slightly longer cooling periods than others. An additional recommendation from experts is to avoid sudden temperature changes during production and always fully cool each layer before pouring another so that the layers don’t mix together when combining different colors or temperatures together. By following these tips, you can ensure you achieve optimal burning results every time!
Conclusion
Making your own beeswax candles at home is incredibly rewarding. Not only does it save you money, but it also allows you to be creative in the process. From scented aromas to intricate shapes, beeswax candles can make a great addition to any home. The soft light will cast a warm, inviting glow throughout the room. Plus, you’ll feel good knowing that the product is entirely natural and sustainable.
If you love candle making, there’s no reason not to try making your own beeswax candles at home! With a few basic supplies and careful attention to instruction, you’ll be able to create an impressive array of unique pieces with ease. Get ready for inspiring results – homemade beeswax candles are beautiful and awe-inspiring! To achieve amazing results, don’t forget to experiment with creative color combinations or exotic fragrance oils. Show of your work proudly by displaying your creations in your living room or simply giving them as unique gifts!
If you haven’t made beeswax candles yet, why wait any longer? Gather all the necessary supplies, follow some simple instructions on this article and take pleasure in seeing the beauty of homemade beeswax candles glimmering throughout your house. Whether it’s used for decorative purposes or aromatherapy relaxation techniques, homemade beeswax candles are one of life’s small treasures that you won’t want to miss out on! Make sure to share photos of your work online by using #beeswaxcandles!

Welcome to my candle making blog! In this blog, I will be sharing my tips and tricks for making candles. I will also be sharing some of my favorite recipes.


