Introduction
A soy candle is a type of candle made from hydrogenated vegetable oil, commonly referred to as soy wax. This wax has a low melting point and is much cleaner when burning than traditional petroleum-based paraffin candles. Soy candles also have the ability to hold more fragrance than paraffin candles and burn twice as long.
Wooden wicks have become increasingly popular with deodorizers due in part to the style and appeal they give off when burning. Wooden wicks offer a unique crackling sound effect that gives off a relaxing atmosphere and ambiance. They are also known for uniform burning which ensures maximum fragrant performance throughout the duration of the burn time. Further, wooden wicks also provide a slower, cooler burn rate compared to various metal core or zinc cores used in paraffin or wax blends, making them an ideal choice for containers with shallow depths where you want maximum scent diffusion without compromising safety or quickly raising the temperature of your container or surface it’s placed on. Additionally, wooden wicks are natural, easy to light and simple to source.
Why Choose Soy Wax for Candle-Making
Soy wax is a great material for making candles because it is all-natural and sustainable. Soybeans are a renewable resource, so you will be doing your part for the environment when you use soy wax for candle-making. Soy wax is also hypoallergenic, meaning that it won’t cause any irritation or allergies like paraffin-based candles might. Additionally, soy wax has a slightly slower burn rate than paraffin, allowing your candle to last much longer. Furthermore, it is inexpensive and easy to find in stores and online. In addition to these benefits, soy candles made with wooden wicks provide an added aesthetic touch as they burn more slowly and evenly while emitting a unique crackling sound. They also contain less soot than regular candles and don’t contain lead or other harmful elements. Wooden wick candles also produce larger flames with brighter colors due to their core being composed of several channels of solid wood fibers combined with paper fibers. All these benefits make them ideal for creating one-of-a-kind home decorations or special gifts that everyone will love!
Essential Supplies Needed to Make Soy Candles with Wooden Wicks
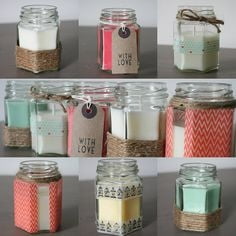
To make your own soy candles with wooden wicks, you will need a few basic supplies. First and foremost, you will need a doubled boiler setup which can be used to heat the wax. Additionally, you should obtain vegan-friendly soy wax flakes (which melt at a lower temperature than traditional paraffin wax), wooden wick sticks, wick tabs for attaching the wick sticks to the bottom of the jar, dye chips or liquid dye to color the candle, scent oil for aromatherapy benefits and any other decorations you may want (e.g., dried petals, glitter). Finally, you’ll need jars of your preferred size for its final shape.
Once all of your supplies are gathered, you are ready to begin making your soy candles with wooden wicks. Start by melting your wax flakes either in the kitchen or in an outdoor workshop space where there is plenty of ventilation. Next, add coloring and scent oil while maintaining consistent stirring so that these additions are evenly distributed throughout the melted wax. Then submerge your pre-treated wood stick in the melted wax in order to prime it while ensuring that one end remains exposed beyond the surface of the wax as this is what will create a larger flame when lit later on. Once priming is complete, insert the primed wooden stick into one of its pre-drilled holes on both sides of a wick tab and then attach this combination firmly with glue to the bottom of each jar before slowly pouring in enough melted wax per container by ladling it from the double boiler until three-quarters full. Finally let it cool overnight before lighting it up!
Step-by-step Guide to Making Soy Candles with Wooden Wicks
1. Start by gathering your supplies: soy wax, a double boiler, candle dye, wooden wicks and containers.
2. Heat the wax in the double boiler on medium heat until it melts completely; you can also melt it in the microwave.
3. If you’re using a dye to color your candles, add it carefully to the melted wax and stir until it is blended evenly. Alternatively use scented oil or fragrance that is formulated for wax melting.
4. Prepare the wooden wick by cutting it to length – about 1/4 inch above the container for best results – and securing it at the bottom of the container with candle glue or hot glue gun.
5. Pour your melted candle wax into the pre-prepared containers and allow them to cool completely before trimming any excess wick that may have burned away while making your candles (typically 10-15 hours).
6. Once cooled, you can adorn completed candles with decorations such as stickers, ribbons or herbs as desired! Store them away from direct sunlight and enjoy their warm glow whenever you want!
Tips on Pouring & Working With Soy Wax & Wooden Wicks
When pouring soy wax for wooden wick candles, it’s important to ensure the wax is between 130 and 160°F. At temperatures below this the wax will be too thick to ensure proper wicking of the candle. The colder the pour temperature, the slower the burn time. Additionally, if you overheat your soy wax and it reaches temperatures above 200°F it can affect the scent throw and cause what is commonly referred to as “mushroom top.”
When working with wooden wicks in soy wax, be sure that they remain fully saturated while burning. You can accomplish this by adjusting the length or width of your wick depending on how much fragrance oil & dye you have added. If your candle becomes anemic (a sooting flame) then either reduce or increase the size of your wick. Be sure to always use a properly sized wick, as any discrepancy will lead to an uneven burn resulting in unburned portions being left after each session of burning.
For success with wooden wicks in soy wax, it’s important to remember that soy wax has a lower melting point which results in longer burn times than paraffin wax but also requires a slightly higher pour temperature. After pouring is complete let your candles cool for at least 12 hours before trimming your wick down to 3/16” ” 1/4″ – these measurements dependent on how large your actual vessel is from which you are packaging them from (the bigger & wider- larger trim). Lastly, when burning make sure you allow your candles to reach a full melt pool each time before extinguishing – this will help eliminate tunnelling & deliver optimal performance!
Troubleshooting Common Candle-Making Mistakes with Wooden Wicks
Making soy candles with wooden wicks can be a delightful craft that yields beautiful results. However, common candle-making mistakes are frustrating and often difficult to troubleshoot. Here are four of the most frequent hiccups one may encounter while creating soy candles with wooden wicks and how to remedy them:
1. Misaligned Wooden Wicks ” Aligning wooden wicks properly is essential for well burning candles. To avoid misalignment, after dipping the pre-tabbed end into your melted wax, tie the wood piece to something above the mould so that it stays in place firmly until solidified.
2. Poorly Centered Wooden Wicks ” A poorly centered wooden wick often leads to tunneling or poor burning throughout your candle. To prevent this from occurring, wait for at least 24 hours before lighting your candle so as to ensure that all excess wax has cooled properly and adhere the wood piece by its centre prior to assembly.
3. Cracking Wax When Filling” An overly vigorous filling method when making soy candles with wooden wicks can lead to cracks around your wooden wick or tiny bubbles along the bottom of your poured container walls. Steer clear of shaking too violently when pouring freshly made liquid wax by using a slow and steady motion instead; this will help create an even layer over various areas of your moulds or containers without causing any damage to the molten material below it.
4. Puffing Wood Pieces – Wooden pieces commonly puff on their own while absorbing melted wax as they expand and cool down during darkening stages. To prevent such puffing from occurring, coat each stick several times with melted wax then remove carefully when hardened prior to assembly (note: one should use heat resistant tweezers or similar tools when managing these delicate objects).
Finishing Touches
When it comes to completing your soy candle with a wooden wick, there are many things you can do to make sure your finished product looks beautiful and professional. Before you begin, make sure the wick is securely attached to the bottom of the container by way of melting the candle wax onto the bottoms of each wick crossbar. Next, use a pair of scissors or wire cutters to trim any excess length off of all of the wooden wicks before lighting them. In addition, be sure that you angle your wicks in such a way that they remain above the surface of your melted soy wax at all times. This will ensure even burning and prevent soot buildup. Finally, use decorative accents such as dried flowers, botanical pieces and dyes to give your candle an extra unique touch!
Conclusion
Making soy candles with wooden wicks is a fun, easy, and affordable craft project. When made correctly, these unique candles have a beautiful crackle sound. The wooden wicks provide an interesting twist to traditional candle-making; they also have lower melt points which produce longer burning times than regular paraffin or beeswax candles. With the proper precautions and instructions, anyone can make a soy candle with a wooden wick without requiring any prior knowledge or skillset in candle-making. You just need quality ingredients such as organic soy wax flakes, natural dyes and fragrances, and some basic equipment like thermometers and melting containers. Making the perfect soy candle with a wooden wick is easier than you may think: all it takes his some patience and creativity! Whether you plan on gifting them away or using them yourself, these unique candles will bring light into people’s lives”wherever they are lit! With the right ingredients and guidance from reliable resources, you can easily learn about safe technique for working with waxes. Start making your very own custom Soy Candles With Wooden Wicks today ” it’s affordable, fun and rewarding!

Welcome to my candle making blog! In this blog, I will be sharing my tips and tricks for making candles. I will also be sharing some of my favorite recipes.


