Candle making has been a beloved craft for centuries, bringing warmth, light, and ambience to our homes. There is something truly special about creating your own candles – the joy of experimenting with different colors, scents, and designs is unmatched. If you’re looking for a new hobby or a creative outlet, wax candle making at home may be just what you need.
Not only is candle making a fun and fulfilling activity, but it also allows you to tailor your candles to your personal taste and style. Imagine filling your home with the soothing scent of lavender or the cozy aroma of vanilla by simply lighting a candle that you made yourself. The possibilities are endless when it comes to the colors, fragrances, and designs you can create.
In this comprehensive guide, we will explore everything you need to know about wax candle making at home. From essential tools and materials to troubleshooting common issues, we will walk you through each step of the process.
Whether you’re a complete beginner or have already dabbled in candle making before, this article will provide valuable tips and techniques to help you create beautiful homemade candles that bring joy and comfort into your life. So let’s dive in and discover the wonderful world of wax candle making at home.
Getting Started
When it comes to making wax candles at home, having the right tools and materials is essential for a successful and enjoyable experience. Before you begin your candle making journey, make sure you have the following items:
- Wax: The most important ingredient in candle making is, of course, wax. There are several types of wax available, such as paraffin wax, soy wax, beeswax, and coconut wax. Each type has its own unique qualities and characteristics, so be sure to choose the one that best suits your needs and preferences.
- Wicks: A wick is what allows the candle to burn by providing a steady flame. When selecting wicks for your candles, consider factors such as size and material. Cotton wicks are commonly used for most candle types, but you can also find wicks made from wood or other materials for a unique touch.
- Containers or molds: Depending on the type of candle you want to create, you will need containers or molds to hold the wax. Glass jars, tin cans, or ceramic containers work well for container candles, while silicone or metal molds can be used for shaped or pillar candles.
- Fragrances: Adding fragrance to your homemade candles can enhance the overall experience. You can choose from a wide variety of scents available in liquid or solid form. Popular choices include lavender, vanilla, citrus fruits, and floral blends. Make sure to check if the fragrance oil is suitable for use in candles.
- Dyes or pigments: If you want to add color to your candles, dyes or pigments specifically made for candle-making are necessary. These come in various forms such as liquid dyes or color chips that can be melted into the wax.
- Heat source: To melt your wax and other ingredients safely, you will need a heat source like a double boiler or a dedicated wax melting pot. Avoid using direct heat sources such as stovetops, as they can be dangerous.
- Thermometer: It’s crucial to monitor the temperature of your wax throughout the candle-making process. A thermometer designed for candle making will help ensure that your wax is heated and cooled to the correct temperatures for optimal results.
- Stirring utensils: You’ll need tools for stirring and blending your ingredients together. Heat-resistant silicone spatulas or stainless steel spoons work well in candle making.
By having these essential tools and materials at hand, you’ll be well-prepared to embark on your wax candle making adventure. Remember to always follow safety guidelines and experiment with different combinations to create unique and beautiful homemade candles.
Choosing the Right Wax for Your Candles
When it comes to making wax candles at home, one of the most important decisions you’ll need to make is choosing the right wax. The type of wax you use can greatly affect the quality and performance of your homemade candles. With so many options available, it’s important to understand the different types of wax and their characteristics before making a choice.
One popular type of wax for candle making is soy wax. Soy wax is derived from soybean oil and is known for its clean-burning properties. It has a lower melting point than other waxes, which means it will produce a longer-lasting candle. Soy wax also has great scent throw, meaning it can hold onto fragrance oils well, resulting in a strong and pleasant aroma when lit.
Another common choice is paraffin wax, which is derived from petroleum. Paraffin wax has a higher melting point than soy wax, so it may produce a stronger scent throw. It’s also known for its smooth finish and ability to hold intricate designs well. However, some people prefer to avoid paraffin wax due to its non-renewable source and potential environmental impact.
Beeswax is another option for those looking for natural alternatives. Beeswax candles have a unique sweet aroma and produce a warm, soft glow when lit. They are also known for their long burn time and ability to purify the air by releasing negative ions. However, beeswax can be more expensive compared to other types of wax.
Ultimately, the best type of wax for your homemade candles will depend on your personal preferences and specific project goals. Consider factors such as burn time, scent throw, cost, and sustainability when making your decision. Experimenting with different waxes can be a fun part of the candle making process and allow you to explore various possibilities for creating beautiful and fragrant creations in your own home.
Selecting the Perfect Fragrance for Your Homemade Candles
When it comes to making homemade candles, one of the most exciting aspects is selecting the perfect fragrance. The scent of a candle can create a specific atmosphere and enhance the overall experience of burning the candle. With countless options available, it can be overwhelming to choose the right fragrance for your homemade candles. However, by considering a few key factors, you can find the perfect scent that will delight your senses and those around you.
Firstly, think about the purpose of your candles. Are you creating them for relaxation and stress relief? Or do you want to use them as a decorative element in your home?
Different fragrances have different effects on our mood and emotions. For example, lavender is known for its calming properties, while citrus scents like lemon or orange are energizing and uplifting. Consider how you want your candles to make you feel or what ambiance you want to create in your space.
Additionally, consider the season or occasion when selecting a fragrance for your homemade candles. Just like our clothing and decorations change with each season, our choice of scents can also align with the time of year. During the warmer months, fresh and light scents such as floral or fruity fragrances might be more appealing. In contrast, during colder months or around holidays, warm and cozy scents like cinnamon or vanilla can add to a cozy atmosphere.
| Scent Category | Characteristics |
|---|---|
| Floral | Romantic, calming |
| Fruity | Energizing, refreshing |
| Herbal | Invigorating, earthy |
| Spicy | Warm, cozy |
| Citrus | Upbeat, uplifting |
| Gourmand | Sweet, comforting |
By considering the purpose of your candles, the season or occasion, and these commonly used scent categories, you can narrow down your options and find the perfect fragrance for your homemade candles. Experiment with different combinations and don’t be afraid to get creative. The right scent can elevate your candle making experience and bring a unique touch to your home decor or gift-giving.
Exploring Different Types of Candle Molds
Candle molds play a crucial role in the wax candle making process, as they determine the shape and size of your homemade candles. By choosing the right type of candle mold, you can create unique and beautiful designs that will enhance the overall aesthetic appeal of your candles. There are various types of candle molds available, each with its own advantages and considerations.
Metal Candle Molds
Metal candle molds are a popular choice among experienced candle makers due to their durability and ability to withstand high temperatures. They are usually made of aluminum or steel and come in a wide range of shapes and sizes. These molds can be reused multiple times, making them cost-effective in the long run.
Silicone Candle Molds
Silicone candle molds are flexible and easy to use, making them ideal for beginners. They are available in a variety of intricate designs and shapes, including flowers, animals, and geometric patterns. The flexibility of silicone molds allows for easy removal of the candles once they have hardened.
Glass Candle Molds
Glass candle molds offer a unique artistic touch to your homemade candles. They are often used for creating container candles by pouring melted wax into heat-resistant glass containers or jars. Glass molds allow you to showcase different layers and colors within your candles, creating stunning visual effects.
When selecting a candle mold, keep in mind the size of the desired end product and the type of wax you will be using. Ensure that your mold is properly cleaned and prepared before beginning the pouring process to prevent any imperfections on your finished candles. Experimenting with different types of candle molds will allow you to unleash your creativity and design truly one-of-a-kind candles that reflect your personal style.
Step-by-Step Guide
One of the most exciting aspects of making wax candles at home is the ability to create unique and beautiful designs using melted wax. Whether you want to make basic pillar candles or experiment with intricate patterns, creating visually appealing designs can add a special touch to your homemade candles. In this section, we will provide you with a step-by-step guide on how to create beautiful designs with wax.
Preparing the Workspace
Before you start creating your wax candle designs, it’s essential to make sure your workspace is clean and organized. Clear any clutter and ensure that you have all the necessary tools and materials within reach. Lay down protective covering on your work surface, such as a plastic sheet or old newspapers, to prevent any spills or messes.
Melting the Wax
To begin creating your wax designs, melt your chosen wax in a double boiler or melting pot over low heat until it reaches its melting point. Stir occasionally to ensure even melting and prevent scorching. Once the wax has completely melted, remove it from the heat source.
Adding Color and Fragrance
To enhance the visual appeal of your designs, consider adding color and fragrance to your melted wax. Use specially formulated candle dyes or blocks designed for candle making, following the manufacturer’s instructions for proper usage and proportions. Additionally, choose a fragrance oil that complements your design concept and carefully stir it into the melted wax.
Pouring and Designing
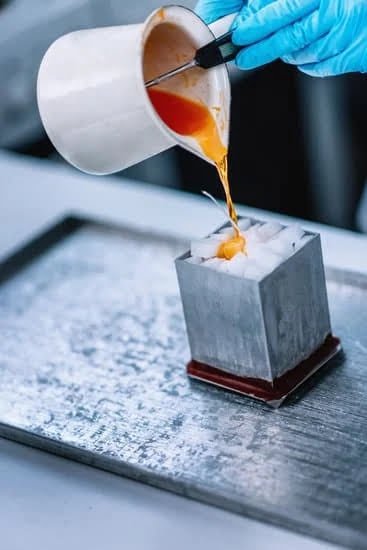
Carefully pour a small amount of colored, scented wax into each individual mold or container you are using for your candles. Depending on your desired design, you can layer different colors of melted wax or draw patterns by pouring one color on top of another while alternating colors between layers. Allow each layer to cool before adding the next one to avoid blending colors together.
Using Tools for Designs
If you want to create more intricate designs, consider using tools such as toothpicks, craft sticks, or skewers to manipulate the melted wax. You can swirl different colored waxes together, create marbled effects, or even carve designs into the hardened wax after it has cooled slightly. The possibilities are endless when it comes to designing with melted wax. Just make sure to work quickly before the wax hardens completely.
By following this step-by-step guide and embracing your creativity, you can create stunning and personalized candle designs that will add a unique touch to your homemade candles. Experiment with different techniques, colors, and fragrances to truly express your artistic flair and create candles that not only illuminate your space but also serve as beautiful decorative pieces.
Troubleshooting Common Candle Making Issues
Uneven Burning
One common issue that candle makers may encounter is uneven burning. This occurs when the candle burns down on one side faster than the other, resulting in an unbalanced appearance and potentially wasting some of the wax. To troubleshoot this problem, there are a few steps you can try.
Firstly, make sure that your wick is properly centered in the candle. A wick that is off-center can cause uneven burning. Use a wick tab or adhesive to secure the wick in place at the bottom of the container or mold.
Another potential cause of uneven burning is drafts or air currents in the room where your candle is placed. Make sure to burn your candles in a draft-free area to ensure an even and consistent burn.
If you continue to experience issues with uneven burning, you may need to adjust the size of your wick. A wick that is too small may not provide enough heat for an even burn, while a wick that is too large may create excessive heat and cause uneven melting.
Sinking Wax
Another common problem in candle making is sinking wax. This occurs when a noticeable depression forms in the center of a container candle as it cools and solidifies. There are several factors that can contribute to sinking wax.
Firstly, it’s important to ensure that your wax is properly heated and melted before pouring it into the container. Insufficient melting can result in pockets of unmelted wax, which can lead to sinking as it solidifies.
Additionally, using fragrance oils or additives that are not compatible with your chosen wax can cause sinking issues. Some fragrances or additives may react with the wax formula and cause it to sink in certain areas.
To prevent sinking wax, make sure to thoroughly mix any additives or fragrance oils into your melted wax before pouring it into the container. This will help to ensure even distribution of additives and reduce the risk of sinking.
Tunneling
Tunneling is the term used to describe a candle that burns down the center, leaving a thick rim of unmelted wax along the edges of the container. This can be frustrating as it reduces the overall burn time and wastes wax.
To troubleshoot tunneling, make sure that you are allowing your candle enough time to achieve a full melt pool during each burn. A full melt pool refers to when the entire top layer of wax has melted, reaching all the way to the edges of the container. This usually takes about an hour for every inch in diameter of the container.
Trimming the wick before each burn is also essential to prevent tunneling. A wick that is too long can create excessive heat, leading to uneven melting and tunneling. Keep your wick trimmed to about 1/4 inch before lighting it.
If you’re still experiencing tunneling issues, consider using a larger or multiple wicks for your candle. This can help to generate more heat and create a wider melt pool, reducing the occurrence of tunneling.
By addressing these common candle making issues and implementing troubleshooting techniques, you can overcome challenges and create beautiful homemade candles that burn evenly and last longer.
Safety Tips
When engaging in the art of wax candle making at home, it is crucial to prioritize safety to ensure a pleasant and secure experience. By following a few key safety tips, you can prevent accidents and hazards while enjoying the process of creating beautiful homemade candles.
Firstly, always make sure you have a clean and clutter-free workspace. Clear away any flammable materials or objects that could pose a fire risk. It’s also essential to choose an area with good ventilation to avoid inhaling toxic fumes from the melting wax and fragrance oils.
Secondly, never leave your melting wax unattended. It is crucial to keep a close eye on the heating process to prevent any mishaps or potential fires. It’s best to use a double boiler or a dedicated candle-making melting pot for safe and controlled temperature regulation.
Additionally, it is vital to understand how different waxes react when heated. Always refer to the manufacturer’s instructions for recommended heating temperatures and procedures. Overheating wax can lead to fires or burns, so it’s essential to maintain the proper temperature throughout the entire candle making process.
Moreover, never pour melted wax down the drain as it can result in clogged pipes and serious damage. Instead, allow the leftover wax to solidify before disposing of it properly in your household trash.
Lastly, keep children and pets away from your candle-making area. Hot wax can cause severe burns if accidentally spilled or touched before cooling down completely. Furthermore, be cautious when handling candle-making tools such as sharp knives or hot surfaces.
By adhering to these safety tips, you can ensure that your candle-making experience is enjoyable, secure, and free from accidents or injuries. Remember that safety should always be prioritized when engaging in any DIY project at home.
Candle Care and Maintenance
Caring for and maintaining your homemade candles is essential to ensure their longevity and optimal performance. With a little attention and care, you can extend the life of your candles and continue to enjoy the warm ambiance they bring to your home. Here are some tips on candle care and maintenance to help you get the most out of your homemade creations.
Firstly, it is important to trim the wick before each use. Trimming the wick to about ¼ inch will prevent excessive smoke, soot, or uneven burning. A long wick can cause the flame to become too large and produce excess heat, which may result in a shorter lifespan for your candle. Trimming the wick also helps reduce any mushrooming or carbon buildup on the top of the wick, ensuring a cleaner burn.
Another aspect of candle care is ensuring that the wax melts evenly across the surface each time you light it. To achieve this, allow your candles enough time during their initial burn for a sufficient wax pool to form all the way to the edges of the container or mold. This helps prevent tunneling or uneven burning in future burns.
Furthermore, it is important to keep your candles away from drafts and other sources of air flow. Drafts can cause candles to burn unevenly and excessively, leading to wastage of wax and a shorter burn time overall. Also, avoid placing your candles near windows or open doors where they could be exposed to direct sunlight or outdoor elements that could affect their quality.
Lastly, remember not to leave lit candles unattended as a safety precaution and always place them on a stable surface away from flammable materials. It is also advisable not to burn more than one candle at a time in order to maintain control over flames and minimize potential hazards.
By following these simple tips for candle care and maintenance, you can ensure that your homemade candles provide hours of enjoyment while extending their lifespan for continued pleasure in scent and atmosphere throughout your home.
Conclusion
In conclusion, wax candle making at home is a wonderful hobby that allows you to tap into your creativity and express yourself through beautiful designs and scents. With the right tools, materials, and knowledge, you can create unique and personalized candles that add warmth and ambiance to any space.
Throughout this article, we have discussed the essential tools and materials needed to get started, as well as how to choose the right wax and fragrance for your candles. We have also explored different types of candle molds and provided a step-by-step guide for creating beautiful designs with wax. Additionally, we have addressed common troubleshooting issues and offered safety tips to ensure a safe and enjoyable candle making experience.
By taking proper care of your homemade candles, you can extend their lifespan and continue to enjoy their beauty and fragrance for longer. Regularly trimming the wick and storing them in a cool, dry place are just a few simple steps that can help maintain the quality of your candles.
So why not embrace the art of wax candle making at home? Not only can it be a fulfilling and therapeutic activity, but it also allows you to create personalized gifts for loved ones or even start your own small business selling handmade candles. The possibilities are endless when it comes to creating unique candles that reflect your personal style and taste.
So go ahead, gather your materials, get creative, and let the soothing glow of homemade candles fill your space with light and fragrance. Happy candle making.

Welcome to my candle making blog! In this blog, I will be sharing my tips and tricks for making candles. I will also be sharing some of my favorite recipes.


