Introduction
Candle making has been an art form for centuries. Historians have found evidence of candle making dating back to ancient Roman and Egyptian times, where candles were made from beeswax, tallow and various other materials. Over the years, candle makers started using beeswax mixed with animal fats to create the ideal wax for their candles. As technology advanced, more efficient ways of producing wax were discovered and the production of candles became a thriving industry. Today, candle making is still a popular hobby”and with a Candle Making Kit For Beginners, you can get all the supplies you need to begin exploring this creative art form!
What to Look For in a Candle Making Kit
When looking for the right candle making kit, it is important to make sure it offers a variety of different materials. A well-stocked kit should include several types of wax, including beeswax, soy wax, and paraffin wax. Each type has a different melting point, so it’s good to have all three options available to you. The kit should also include wicks of various sizes as different containers will require specific sizes. And don’t forget about scents and colors ” these are key elements in making a great smelling or visually pleasing candle and should be part of any beginner’s kit. Lastly, some kits may come with pre-made molds that can help speed up the process for first-time makers. With all these supplies on hand, you’ll be able to mix and match to create unique candles every time!
Step-by-Step Guide
Step 1: Gather Supplies – Assemble the necessary supplies to make the candle. This includes, wax or soy wax, a container for the candle, wicks, additives (such as color, fragrance and dyes), a double boiler or microwave, a thermometer and a stirring spoon.
Step 2: Melt Wax – Put the wax into the double boiler or heat in the microwave if you are using a microwave-safe container. Heat until all of the wax is melted and a temperature of 160°F is reached.
Step 3: Add Fragrance & Color – Carefully add the scented oils, colorants and dyes to achieve desired effect. Stir with a wooden spoon while adding these items in small amounts until desired result is achieved. Do not exceed recommended temperature of 180°F when doing this step.
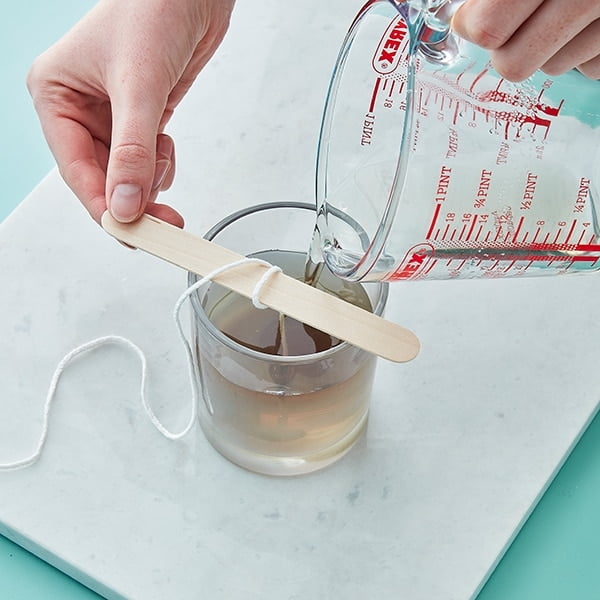
Step 4: pour Candle – Dip your wick into wax and put it inside your container before pouring it in. Make sure that it stays upright by tying off one end with string or tape at the bottom of your container so that it becomes submerged during pouring. Slowly pour your liquid wax into the container making sure to still keep it in an upright position as you do so. Fill up to just below the top edge of your container and allow for cooling gaps where you can place decorative embeds (i.e., crystals) afterward for added character if desired.
Step 5: Allow Candle Cool – Allow your finished candle at least 2 hours of cooling time before handling or testing out its properties (make sure that it has hardened fully before trimming down wick). Once cool, trim down wick using scissors keeping length between ¼ inch to 1 inch depending on type of candle created; this helps generated proper flame size without any spill-over “fishtails” when burning each time!
Step 6: Enjoy Your Candle! ” Lightly dust off any spills prior to burning if needed then enjoy relaxing atmosphere brought on by beautiful homemade creation!
Essential Tools for Candle Making
When getting started in candle making, it is important to have the necessary tools at hand. For heating equipment, a double boiler or slow cooker is often recommended for melting wax. Depending on how many candles you plan on making and their size, you may even want to invest in a wax melter pot for larger batches of wax. Containers also come in different sizes and shapes, depending on what type of candle you’re making. For votive candles, you’ll need some sort of glass container that is heat-safe, while jar candles may require either an array of canning jars or mason jars. Furthermore, if color and scent are desired in your candles, these should also be taken into consideration when deciding on the right containers to use. Finally, other items such as wicks, glue dots to secure the wick in place, and thermometers might also need to be purchased.
Inspirational Projects
The Candle Making Kit for Beginners includes professionally assembled supplies and instructions that not only helps to make homemade candles, but also brings out the creative side of the crafter. Inspirational project ideas help show off the full potential of this craft. Videos and images should be used alongside these projects to illustrate other possibilities as well as showing more detailed instructions such as remelting wax, mixing colors, and creating unique molds. With these resources, novice candle makers can become more confident in their abilities to craft stunningly beautiful candles. In addition, hobbyists can have greater access to an exciting range of ideas and materials that take their craft further than ever before.
Safety Tips
When melting and pouring wax, it is important to take safety precautions. First, it is essential to read all labels before handling any products. Colloquially called “melt and pour method” of candle-making, always ensure you are wearing protective gloves and eyewear when handling hot wax. It is also highly recommended that you work in a well ventilated room as the fumes can be very strong. Moreover, keep an eye on the melted wax’s temperature since overheated wax can quickly become a hazard. Lastly, if water spills on or near your candle-making kit, turn off any nearby heat sources immediately and discard any wax currently being melted. Doing these simple steps whilst working with melted wax will ensure your safety while making candles!
Troubleshooting Tips
When adjusting the wick length, it is important to make sure the tab has enough stability and allows the wick to burn properly. One technique that can be used to ensure this is dipping the tab in melted wax and then trimming the excess length off when it has dried. This will help keep the tab secure and make sure the flame will stay steady.
Another technique for adjusting the wick length is using a stapling gun. This is effective for getting rid of excess wick material that may stick up above the top of your candle. Simply measure and cut the desired length of your wick, then staple it down onto your wax mold or container. This approach can save you time and stress as you won’t need to manually trim any extra long pieces of wick.
Finally, an important part of troubleshooting with wicks is making sure they are securely attached in their tabs. Depending on your kind of candle making project, there are several different ways to do this such as tying them into knots underneath or glueing them onto wooden disks then pushing these disks onto a secure base. Ultimately, whichever technique you use needs to ensure stability so that you do not run into any issues later on with burning candles!
Wrapping it Up
Creating your own homemade candles is a fun, creative and cost-effective activity. With this candle making kit for beginners, you can explore the world of candle making right out of the box. Embrace the materials and instructions provided in this guide, place them into practice and have fun experimenting with various scents, colors, and shapes to create beautiful handmade candles that will make your house feel like home. Don’t be afraid to take what you’ve learned here even further ” there are endless possibilities when it comes to candle making! Enjoy your journey into the world of candles!

Welcome to my candle making blog! In this blog, I will be sharing my tips and tricks for making candles. I will also be sharing some of my favorite recipes.


