Introduction
Making scented candles can be an incredibly rewarding and enjoyable experience. Not only can you benefit from having your own custom-made aromas in your home, but you can also save money on purchasing ready-made candles in stores. Furthermore, it is a great way to express your creativity and put together the perfect mood for any occasion. With just a few simple steps, you can make your own unique scented candles with ease.
Step One: Gather Materials – What Do You Need?
Before you begin making scented candles, it is important to have all the necessary materials readily available. This includes wax pellets or chips, wick tab with metal sustainer base, essential oils of your choice, a double boiler or candle warmer (heat source), fragrance oils (optional), thermometer, measuring cups/spoons and glass jars or containers. It is recommended to use glass containers because they will not react when exposed to heated wax.
Step Two: Melt The Wax – How Can You Do This?
The easiest way to melt wax is by using a double boiler or candle warmer. If using the double boiler method, fill one pot with water and set on medium heat until boiling. Place wax pellets into another pot and set this over the boiling water so that it rests inside the other pot. Use a thermometer to monitor temperature and make sure that it does not exceed 125° Celsius (127° Fahrenheit). To ensure even melting and prevent overheating of the wax in some areas,let it sit for at least 10 minutes before stirring continuously until fully melted.
Step Three: Add Fragrance Oils – How Much Should I Use?
Adding fragrance oils is what takes your candle making project to the next level! Depending on how strong you would like the scent of your candle to be, use 1 teaspoon of oil per 8oz of wax with a maximum ratio of 2 teaspoons per 8oz of wax for extra strong scented candles. Once poured into your melted wax mixture it should take around 10 minutes for them to fully incorporate before pouring into molds this step can determine if it gets too cold and won’t stay together when finished!
Step Four: Pour Wax Into Molds And Wait – How Long Does It Take For The Candle To Set?
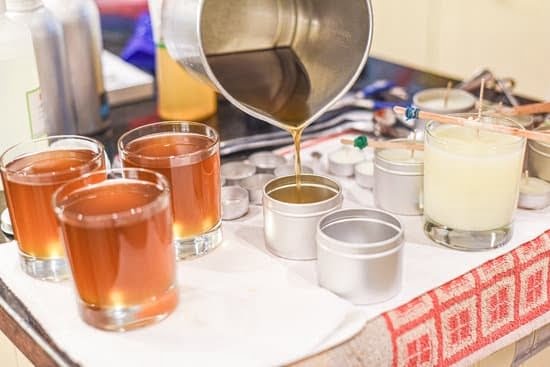
After adding fragrance oil into melted wax mixture, pour it carefully into desired molds/containers ” do not forget about adding wick tabs beforehand!. Leave for 24 hours to cool down before attempting any adjustments or decorations such as cutting off extra wicks etc.. Once cooled down completely it’s time to enjoy your homemade masterpiece ” no store brought ones are quite as unique!
Gather Materials for Candle Making
Before you can begin to make your own scented candles, you will need a few materials. For this project, you will need candle wax (paraffin wax or soy wax are popular), wicks that are pre-tabbed and designed for the type of wax you are using, and containers for the finished products such as decorative mason jars, glass votives, or metal tins. Additionally you will need fragrant oils to add the pleasant aromas that make your candles inviting. Once you have gathered up all your materials, it’s time to get started!
Preparing the Materials for Candle Making
To make scented candles, you will need to have a few components on hand. First and foremost, you should procure wax. Generally speaking, the most popular type of wax used in candle making is paraffin; it’s easy to work with and has a low melting point that ensures optimal pouring temperatures are low enough that there’s virtually no risk of burning someone. You will also want something to melt down your wax in such as a double boiler or crock pot. Additionally, you’ll need fragrances (or essential oils if you prefer) to scent your candles (just make sure they’re formulated for candle-making purposes), as well as wicks and wick holders or wick sticks/clay discs to hold the wick in place. Finally, depending on what kind of look you’re going for with your candles, you may need decorative embellishments such as washi tape or printed labels, votives or container jars, and even craft glue if opting for the latter. With all of these components ready to go, it’s time to start creating!
Melting the Wax and Dipping the Wicks
Making scented candles is an enjoyable and satisfying project. First, gather all the supplies you will need. This includes wax, a melt pot, scent oil, wicks, containers and a thermometer. Begin by melting the wax in the melt pot over medium heat. Be sure to carefully watch the temperature of the wax with a thermometer; when it has reached 165 degrees Celsius remove it from the heat source and add in your desired scent oil. You will want to adjust this amount based on your own preferences; when it has been fully incorporated into the wax start dipping in the wicks for about 15 minutes or until it reaches room temperature. Allow them to dry before inserting them into their containers and adding additional decorative touches of your choosing such as ribbons or glitter if desired then pour in the liquid wax before trimming down any long wicks that have been created with your dipping process. Finally, wait overnight before lighting up your brand new scented candle!
Steps to Making Homemade Scented Candles
1. Gather all necessary supplies: wax, wicks, melted wax container (double broiler or metal mixing bowl), candlestick holders for small votives or tins for shallow-container candles, dye chips and essential oils or fragrance oils.
2. Set up your workspace in a designated area with newspaper and other protective padding to prevent wax spills on the floor and countertops. Place your prepped containers with suitable wicks into their designated holders for easy stability during the pouring process.
3. Heat up the wax using a double-boiler or a metal mixing bowl over boiling water on the stove top until it has melted enough to be poured into your containers without setting off any alarms from burning smoke detectors!
4. Once melted to suitable temperature as determined by you, add a few drops of natural fragrance oils into the heated wax while stirring continuously until they have mixed evenly throughout the pourable liquid. Avoid using too much as stronger scents require no more than 6ml per 500g of total wax mixture used. If using dye chips instead, make sure they are fully dispersed into the liquid before moving onto Step 5 below!
5. Carefully pour the liquified scented wax into its designated candlestick holder/container and allow it to cool completely before starting Step 6!
6. Once cooled and hardened you can now decorate your homemade candles as desired ” from adding some extra essential oils at this time to embellishments which will give them that personal touch!
Finishing Touches for a Professional Look
When it comes to making your own scented candles, the options for decoration and packaging are endless. For a professional look, adding colored wax flakes or glitter can give your candles an eye-catching finish. If you want to add another layer of color, you could use food coloring to create interesting swirls or patterns in the melted wax. Additionally, if you have purchased candle tins or special glass containers, match them up with ribbons, lace and other accessories to really make them stand out! In terms of packaging, if you want to make them a gift or add extra presentation value ” fill boxes with recycled shredding paper and carefully place the candle in the box surrounded by tissue paper. Choose different shades to compliment your candle design! Finally don’t forget labels ” silky stickers look amazing when heat sealed onto jars or lids!
Troubleshooting Common Candle Making Issues
Making your own scented candles can be an enjoyable, rewarding experience. However, the process isn’t always straightforward and there can be some common issues that may arise when making candles. The key is to troubleshoot the issue quickly so you can get back to enjoying creating beautiful candles at home.
Common candlemaking issues include: incorrect measurements of wax, fragrance or colour; overheated wax resulting in a multitude of issues; wicks too short or too long or not centred; not completing the burning technique steps properly; and mottling (unevenness) on the surface of candles due to insufficient blending of fragrance oils, colours and/or additives prior to pouring the candle.
When it comes to troubleshooting each of these issues correctly, there are a few steps you can take. Firstly, make sure all measurements of your supplies are correct as this will prevent any further problems occurring down the line. Also check that your wax doesn’t become overheated – this could result in poor colouring or discoloration, softened wax that won’t hold its shape along with other problems associated with extreme heat. If you’re having difficulties with your wicks then make sure they are cut correctly when inserted into your containers for even support. Taking extra care when following each step of the guidelines for burning techniques such as putting enough wax in each pool will also help avoid any missteps in the future. Finally, have patience with mottling as it may take a few attempts before mastering this technique in order to get an even finish on your scented creations!
Experimenting With Different Scented Candle Making Techniques
Making scented candles can be a fun and creative activity, particularly if you enjoy experimenting with different scented candle making techniques. Before embarking on this exciting journey, it is important to decide what type of wax and scent combination you would like to use. Popular waxes used in candlemaking are beeswax and soy. As for the scent, essential oils like rosemary and lavender are great additions to any homemade candle. Once you have picked out your preferences, the next step is gathering other necessary items such as wicks, jars or tins, double boilers, thermometers, dyes or color chips, additives like glitter or sparkles etc. Additionally, it’s wise to have safety equipment such as safety glasses and oven mitts close by in case of accidents.
When melting wax (preferably done over low heat), make sure to follow the directions given on the packaging carefully in order to avoid any mishaps. It is recommended that you melt enough wax that will fit into the container where you’ll be pouring it into after”melting more than what you need is never a bad thing! Once melted down completely at an appropriate temperature (again depending on the instructions on your wax package), add your fragrance oil of choice (which can be anything from citrusy grapefruit oil to earthy patchouli) and stir a few times for good measure. The fragrance amounts typically depend on individual preference too so make sure play around with different ratios before committing one recipe! You may also choose to add dye chips or mica power if colour is something desired. Last but not least”don’t forget the wick! Once everything has been added accordingly pour it slowly into your container while tapping gently on countertop every few seconds to ensure even distribution throughout (and removal of air bubbles!). After letting cool/curing overnight – light away!
Final Thoughts on How to Make Scented Candles
Making scented candles can be an incredibly rewarding and therapeutic experience. Not only can you make unique pieces of home décor, but you can customize fragrances that evoke memories of your favorite places and people. Additionally, the process provides a great opportunity to create something for yourself or give as gifts to friends and family.
When making scented candles, it is important to use quality, scent-specific materials so that your candle’s scent is true to its form. Consider using scented oils and waxes with your own mix of essential oils for maximum control over the fragrance strength. Depending on the type of candle you are making, wooden wick candles may provide a longer lasting burn as well as a diffused flame with natural crackling sound. You should also consider the colour of candle wax for coordination purposes for a consistent look throughout each room in your home.
Creating custom scents can be daunting, that’s why it is helpful to have techniques like blending and layering available to build out new fragrances until you craft one that fits perfectly with you or someone else’s tastes. Developing an understanding of base notes (fragrances that last) and top notes (fragrances that evaporate quickly) are especially useful in creating complex blends while also knowing when to stop adding ingredients unless they add subtlety to other notes already present in the blend. Lastly incorporating additional accessories such as botanicals (age appropriate flowers), herbs, dyes distributed evenly throughout the mixture may help add personality – literally!

Welcome to my candle making blog! In this blog, I will be sharing my tips and tricks for making candles. I will also be sharing some of my favorite recipes.

