Introduction
Making soy candles can be a deeply satisfying and earth-friendly activity. Not only does it provide a unique opportunity for creativity with numerous scents, colors, and shapes to choose from, but it is also an eco-friendly alternative to paraffin wax candles. Soy candles require fewer chemicals during processing, are biodegradable, and burn cleaner. Furthermore, not only are you creating something special and unique with your own two hands, but they make great presents or heartfelt gifts that the receiver will treasure. Whether you’re looking for a meaningful activity to do alone or with loved ones, making soy candles can be fulfilling in more ways than one.
The Supplies Needed
In order to make the perfect soy candle, you will need a few supplies including: soy wax flakes, a heat-resistant container in which to melt and pour the heated wax, a double-boiler (if using traditional wax flakes); or a microwave, if using soy wax chips/pucks; premade wicks, Wick holders – available in multiple sizes and shapes; a thermometer to measure the temperature of your melted wax; fragrance oil that is specifically formulated for candle-making use (available at many craft stores as well as online retailers); and optional color dyes or glitters for added design effects. You can buy all of these supplies separately or purchase an all-inclusive kit for making soy candles.
Once you have gathered all your supplies, it’s time to begin the fun process of making your own personalized soy candles! Start by heating the wax in either a double boiler (for traditional flakes) or microwave (for pucks/chips) taking care not to exceed 180°F/82°C. As the wax melts, add any desired colors and fragrance oils until you reach your desired hue and scent strength. Once combined, allow the melted blend to cool down slightly before pouring into your premeasured container. Securely place a pre-made wick at the bottom center of your vessel per manufacturer instructions; be sure that this wick is centered so that it remains securely upright during its lengthening burn time. After allowing time for cooling and hardening of your poured mixture – typically around 6 hours – trim wicks down leaving 1/4″ remaining above solidified surface. Lastly, enjoy your beautiful handmade creation!
Preparing the Wicks
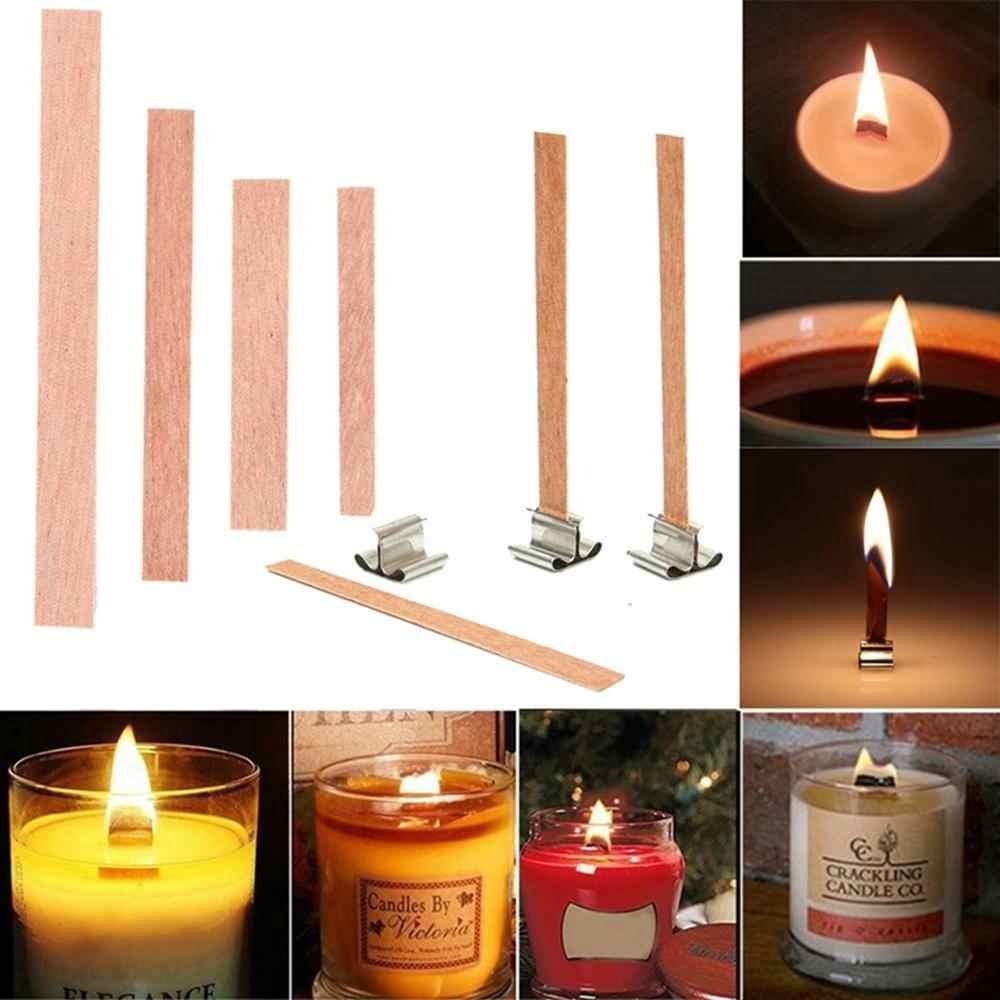
When preparing the wicks for your soy candle, choose a wick that is made for soy wax. Natural wicks like cotton or hemp are best for this type of wax as they do not contain additives that can negatively affect your candle. To install the wick, it’s important to secure it in the center of your container. Begin by gluing the adhesive tab at the bottom of the wick on the bottom of your container. Then thread the top end through a metal sustainer which helps keep the wick centered and prevents it from drowning in melted wax. Position the sustainer inside of your vessel and hang some weight around it until it is taut and stick down with a dab of hot glue or sticky wax. When selecting different sizes, you’ll have to experiment to see what works best with each type of container or size candle you make. Start with small sizes for tea-lights and tarts and move up from there when doing jars or votives.
Choosing the Wax
When making a soy candle, the type of wax you use is a key factor in determining a successful product. The two most commonly used types of wax for making soy candles are vegetable-based wax and paraffin, both of which have different melting temperatures that should be considered when selecting your wax.
Paraffin wax has a higher melting temperature than vegetable-based wax, which means that it takes more time to melt and pour. It also produces longer burning candles but can produce more soot when burned, making it a less desirable option for some consumers. On the other hand, vegetable-based wax melts quicker than paraffin and produces fewer emissions when burned. This makes it an attractive option for those looking for natural products or for those concerned about the environmental impact of the candle making process.
In terms of wicks, there are several types available on the market to choose from including cotton core wicks and wood core wicks. Cotton core wicks require pre-prepared braid heads and melted stearic acid as part of their setup procedure to give them consistent burning characteristics throughout its life cycle. Wood core wicks are slightly harder to work with but they allow you to easily adjust their size depending on your desired end application thanks to their lacing structure.
When choosing which type of wax and wick to use in your soy candle project consider factors such as the melting temperature required, ease of use in terms of pouring and setting up the wick, desired burning duration and sooting behavior, as well as any environmental concerns associated with your selection.
Melting the Wax
Making the perfect soy candle starts with melting the wax. It is important to only use food-grade ingredients when crafting a soy candle, as these are typically non-toxic and much safer for burning at home. Wax can be melted either in the microwave or on the stove. When melting wax for a soy candle, it is important to measure and combine the ingredients correctly. You will want to mix one part soy wax flakes with two parts paraffin wax flakes, making sure each ingredient is fully melted before combining them together. For maximum scent, you should add 2 ounces of scent oil for every pound of wax used in your candle. Once combined, mix this mixture until it is completely consistent throughout. From there, pour the mixture into your mold and wait until it has cooled and set before adding a wick and finally lighting your perfect handcrafted soy candle!
Pouring the Soy Candle
1. Heat the wax to between 165-180 degrees Fahrenheit. Do not exceed 190 degrees to ensure you keep the natural qualities of soy wax.
2. Place the wick in the center of your candle container or mold, and make sure it is straight and secure.
3. Pour the melted wax into the mold first and then center the wick within the wax when it begins to set up.
4. Allow room-temperature wax to cool for 24 hours without disturbing it before doing anything else with it.
5. Once cooled, use a pencil or chopstick to hold up the end of the wick so that it remains straight while pouring additional layers of wax to fill in any gaps and create a pleasing shape (do this as quickly as possible after pouring as cooler wax may sometimes cause minimal shrinkage).
6. If desired, add fragrance oils or dyes once initial cooling phase is complete; repeat steps 4 & 5 until container/mold is filled with enough melted wax for your desired size candle.
7. Trim away any excess wick after pour has been completed; allow candles to cool completely before using or gifting them (this can take approximately 48-72 hours depending on ambient temperature).
Adding Fragrance
When choosing a fragrance for a soy candle, it is important to consider the type of wax that you are using. Generally, fragrances tend to last longest in soy wax, as it has a naturally low melting point compared to other types. Choosing a fragrance with an aroma you like is very important and there are various resources online that can help you decide which notes and scents would go best in your candle.
When adding fragrance to the melted wax mixture, it is important to follow the instructions on the packaging of your particular wax. Soy wax will typically require droplets of essential oils or concentrated fragrances added before pouring the melted wax into the jar or container. Soy candles require only two or three drops per ounce of wax; however, this may vary depending on the type and brand of fragrance being used.
To ensure that your scent is infused evenly through your candle, it is important to heat both the wax and fragrances together at around 195 degrees Fahrenheit. This temperature should be held for 10 minutes before inserting one implemented wooden stir stick into the heated mixture every few minutes until all ingredients are fully blended together. If a stronger scent is desired, more drops may be added but temperature should not exceed 200 degrees Fahrenheit during mixing. Once all ingredients have been blended together properly and cooled slightly it will be ready to be poured into containers and allowed time cool before being lit and enjoyed!
Decorating the Candle
Decorating the soy candle can be an enjoyable and creative process! There are many different techniques for making your candle look beautiful. Decorative labels can add an extra special touch, or why not try adding some botanicals, like dried flowers, herbs or spices? For a modern look, you could use wax cubes with a letter or number to create custom patterns. If you want to go all out, consider adding some glitters or other sparkly embellishments. You can also make ribbons around the surface of the soy candle. Finally, choose either a scented or non-scented version depending on your preference. Whether you choose to keep it simple or jazz it up with ornate embellishments, decorating your soy candle is sure to be a fun activity for all!
Enjoying Your Soy Candle
Burning and storing your soy candle is easy! The main point to remember with all candles, including soy candles, is to keep an eye on them when lit. Never leave a lit candle unattended. Be sure to place them away from drafts or anything else that could become a fire hazard.
When you are through burning the candle, be sure to extinguish all flames completely. Allow the wax at the top of the container to cool completely before touching it in order to avoid being burned.
Additionally, keeping your soy candle stored properly is important for preserving its scent, shelf life and quality. When not in use, store your homemade soy candles in a temperature-controlled area such as a closet or cupboard and avoid direct exposure to sunlight or other sources of heat. Ideal storage locations would be dry, odor-free areas where temperatures remain relatively constant throughout the year.
Displaying your homemade soy candle is just as important as burning it so it looks beautiful in any room. If you’d like your candle displayed on a table or countertop, place it on a ceramic coaster or heat resistant surface that matches the décor of your space.
Finally, getting the most out of your homemade soy candle means taking care of it at all times when fueling and exposing your DIY masterpiece to air. This will help prevent absorption of moisture from cold air and changes in temperature which can cause uneven burning pathways due to wax shrinkage and build up during colder weather periods.
Conclusion
Creating your own soy candle is a great way to indulge in the satisfaction of making something special. It is a simple and enjoyable activity that can be done at home without any prior experience, allowing for a range of custom gift options which you can be proud to give. Soy candles burn for longer with much less soot, and there are countless possibilities for scent combinations using essential oils or fragrances. Making your own soy candle allows you to control both the size and scent, meaning you can easily tailor them most situations. With some basic supplies and equipment, creating the perfect soy candle is easy and definitely rewarding.

Welcome to my candle making blog! In this blog, I will be sharing my tips and tricks for making candles. I will also be sharing some of my favorite recipes.


