Candle making with beeswax has a long-standing history dating back centuries, known for its natural, sustainable, and aromatic qualities. Beeswax, sourced from honeybees, is favored by many candle makers for its clean burn and subtle fragrance. This section will delve into the origins of beeswax in candle making and the various benefits it offers.
Throughout history, beeswax has been valued for its purity and bright flame, making it a popular choice for creating candles. Beyond its aesthetic appeal, beeswax candles are also known for their longer burn time compared to traditional paraffin or soy candles. Additionally, beeswax emits negative ions when burned, which can help purify the air in your home.
In the following sections of this article, we will explore how beeswax is collected through beekeeping practices and the differences between filtered and unfiltered beeswax. Understanding these aspects is crucial in selecting the right type of beeswax for your candle making endeavors. Stay tuned to learn more about essential supplies needed for crafting beeswax candles and a step-by-step guide to creating your own beautiful and eco-friendly candles.
The Process of Collecting Beeswax
Beeswax is a natural substance produced by honeybees and has been used for centuries in various applications, including candle making. The process of collecting beeswax begins with beekeeping, where beekeepers maintain colonies of bees to harvest honey and other products like beeswax. Beeswax is a byproduct of the honey-making process, as bees produce this wax to build their honeycombs.
During the beekeeping process, beekeepers carefully extract beeswax from the honeycombs without harming the bees or disrupting the hive. This collected beeswax is then purified through filtering to remove any debris or impurities that may have been gathered during extraction. Filtered beeswax is preferred for candle making as it results in cleaner and more consistent candles.
Harvesting beeswax is a labor-intensive process that requires patience and skill. Beekeepers must handle the extracted wax with care to preserve its quality for candle making. Once harvested and filtered, the beeswax is ready to be transformed into beautiful and fragrant candles through a meticulous process that ensures high-quality end products.
| Benefit | Detail |
|---|---|
| Purity | Filtered beeswax ensures cleaner and more consistent candles |
| Quality | Beekeepers handle wax with care to preserve its quality |
Choosing the Right Beeswax for Candle Making
When it comes to candle making with beeswax, one of the crucial decisions that crafters need to make is choosing between filtered and unfiltered beeswax. Filtered beeswax has been processed to remove impurities such as debris, pollen, and leftover honey, resulting in a cleaner and more consistent appearance. On the other hand, unfiltered beeswax retains more of its natural color and aroma, but may contain particles that could affect the final quality of the candles.
Filtered beeswax is often preferred by beginners or those looking for a more refined finish to their candles. The removal of impurities during the filtering process ensures that the wax burns evenly and cleanly without emitting excess smoke or soot. Additionally, filtered beeswax is easier to work with as it typically has a smoother texture, making it ideal for intricate candle designs or decorations.
Conversely, some candle makers opt for unfiltered beeswax for a more authentic and rustic look to their candles. The natural color variations and subtle honey scent of unfiltered beeswax can add character and charm to the finished product.
However, working with unfiltered beeswax may require extra care during the melting process to prevent any debris from affecting the clarity and appearance of the candles. Ultimately, choosing between filtered and unfiltered beeswax depends on personal preferences and desired outcomes for your candle making projects.
Essential Supplies for Candle Making With Beeswax
Choosing the Right Molds
When it comes to making beeswax candles, selecting the right molds is crucial. Silicone molds are a popular choice as they are flexible and make for easy candle removal once set. You can also opt for metal molds that provide a professional finish to your candles. Consider the size and shape of the mold based on the type of candle you want to create – whether it’s a pillar, votive, or container candle.
Picking the Perfect Wicks
The wick you choose plays a significant role in how your beeswax candles burn. Cotton wicks are commonly used for beeswax candles as they offer a clean and steady burn. Ensure that the wick is appropriately sized for the diameter of your candle to prevent tunneling and uneven burning. For larger candles, consider using multiple wicks to ensure an even burn pool.
Adding Fragrance to Your Candles
While beeswax itself has a natural honey-like scent when burned, you can enhance the aroma by adding fragrance oils or essential oils. Be cautious when selecting fragrances as some may not mix well with beeswax or affect its burn characteristics. Opt for high-quality fragrance oils specifically formulated for candle making. Experiment with different scents to create unique combinations for your beeswax candles.
Step-by-Step Guide to Making Beeswax Candles
Beeswax candles are a popular choice for many candle makers due to their natural and sustainable properties. When making beeswax candles, it is essential to follow a step-by-step guide to ensure that the process goes smoothly and the end result is a beautiful, high-quality candle.
The first step in making beeswax candles is melting the beeswax. This can be done using a double boiler method or a dedicated wax melter. It’s important to melt the beeswax slowly and at a low temperature to preserve its natural properties. Beeswax has a high melting point, so patience is key in this step.
Once the beeswax is completely melted, it’s time to add any desired fragrances or essential oils. Be sure to use scents that are safe for candles and follow recommended guidelines for usage amounts. After adding fragrance, carefully pour the hot beeswax into prepared candle molds or containers with pre-tabbed wicks. Allow the candles to cool and set completely before trimming the wick and enjoying your handcrafted beeswax candles.
| Key Point | Detail |
|---|---|
| Melting Beeswax | Melt slowly at low temperatures to preserve properties |
| Adding Fragrance | Use safe scents and follow recommended guidelines |
| Pouring Beeswax | Pour into molds or containers with wicks, allow to cool completely |
Tips and Tricks for Perfect Beeswax Candles
When it comes to making beeswax candles, there are several tips and tricks that can help you achieve perfect results. Here are some insider hacks to ensure your candles turn out beautiful and long-lasting:
- Opt for filtered beeswax: Filtered beeswax is typically preferred for candle making as it removes impurities and debris, resulting in a cleaner burn and smoother appearance.
- Use the right wick size: Choosing the correct wick size is crucial for a successful beeswax candle. A wick that is too small may not provide enough heat to melt the wax evenly, while a wick that is too large can cause smoking and uneven burning.
- Consider adding essential oils: To enhance the fragrance of your beeswax candles, consider incorporating essential oils during the melting process. Popular choices include lavender, citrus, or vanilla scents.
In addition to these tips, here are a few more tricks to perfecting your beeswax candles:
- Avoid overheating the wax: Beeswax has a high melting point, so it’s important to avoid overheating it as this can degrade the quality of the wax and affect the final appearance of your candles.
- Experiment with different molds: Get creative with your candle shapes by using various molds such as silicone molds or vintage containers. This allows you to create unique designs and styles for your candles.
- Add decorative elements: Consider embellishing your beeswax candles with dried flowers, herbs, or natural dyes to add visual interest and personal flair to your creations.
By following these tips and tricks, you can ensure that your beeswax candles not only look stunning but also burn evenly and emit a delightful fragrance throughout your space. Candle making with beeswax can be a rewarding experience, especially when you incorporate these insider hacks into your crafting process.
Exploring Different Candle Making Techniques
Rolled Beeswax Candles
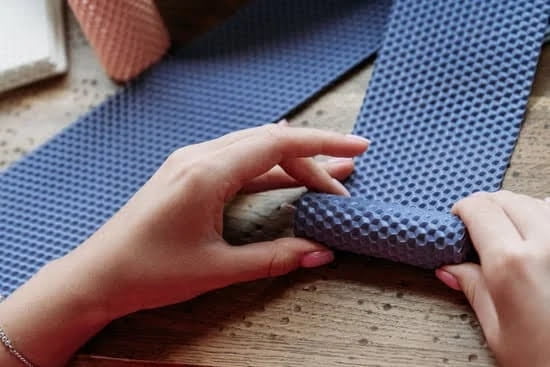
Rolled beeswax candles are a popular choice for those looking for a simple and quick candle making technique. To make rolled beeswax candles, you will need sheets of beeswax, wicks, and optional embellishments like dried flowers or herbs for decoration. Begin by cutting the beeswax sheet to the desired length and width, then place the wick at one end and roll the sheet tightly around it.
Press the edges together to secure the shape and trim any excess wick. Rolled beeswax candles are great for beginners or as a fun project for kids.
Molded Beeswax Candles
Molded beeswax candles allow for more intricate designs and shapes compared to rolled candles. To create molded beeswax candles, you will need silicone molds in various shapes such as hearts, stars, or geometric patterns. Melt the beeswax in a double boiler, then pour it into the molds with the wick placed in the center.
Allow the wax to cool and harden before removing it from the mold. Molded beeswax candles can be great for special occasions or gifts as they can be customized with different colors and scents.
Dipped Beeswax Candles
Dipped beeswax candles involve repeatedly dipping a wick into melted beeswax to build up layers of wax. This technique results in tapered or cylindrical candles with a smooth finish. To make dipped beeswax candles, set up a dipping station with melted beeswax at an appropriate temperature.
Dip the wick into the wax, allowing it to cool between each dip until you achieve your desired candle size. Dipped beeswax candles require patience and precision but can create elegant and traditional looking candles that are perfect for home décor or gifting purposes.
Creative Ways to Customize Beeswax Candles
Beeswax candles are not only a natural and eco-friendly option for lighting up your space, but they also provide endless opportunities for customization. Adding color, texture, and fragrance to beeswax candles can truly elevate the overall experience and make each candle unique. Here are some creative ways to customize your beeswax candles:
- Color: One way to add a pop of color to your beeswax candles is by using natural dyes or pigments. You can experiment with different shades by mixing in small amounts of dye until you achieve the desired color intensity. Be mindful of using safe, non-toxic options that won’t compromise the quality of your beeswax.
- Texture: Creating textured beeswax candles can add a beautiful dimension to your finished product. You can achieve texture by imprinting patterns onto the surface of the candle while it’s still warm and pliable. Consider using unique stamps, lace fabrics, or even dried flowers to create intricate designs.
- Fragrance: Infusing your beeswax candles with aromatic scents can enhance the ambiance of any room. You can incorporate essential oils or fragrance oils specifically designed for candle making into your melted beeswax. Experiment with different combinations to create signature scents that cater to your preferences.
Customizing your beeswax candles allows you to express your creativity while enjoying the benefits of these all-natural beauties. Whether you prefer vibrant colors, intriguing textures, or captivating fragrances, there are countless ways to make your beeswax candles stand out.
In addition to adding color, texture, and fragrance, consider combining these elements creatively to craft one-of-a-kind candles that reflect your personal style and aesthetic. Get inspired by nature, art, or current trends as you experiment with different customization techniques for your beeswax creations.
Benefits of Using Beeswax Candles
Beeswax candles offer a multitude of benefits that go beyond just providing light and ambiance. When it comes to environmental impact, choosing beeswax candles over paraffin or soy candles can make a significant difference. Beeswax is a natural, renewable resource that is biodegradable and burns cleanly without releasing harmful toxins into the air. By supporting beekeeping practices and opting for beeswax candles, you are contributing to the preservation of honeybee populations and the environment.
In terms of health benefits, beeswax candles are a popular choice for individuals with sensitivities to artificial fragrances or chemicals found in other types of candles. Beeswax emits a subtle honey-like scent when burned, creating a warm and inviting atmosphere without overpowering artificial fragrances. Additionally, beeswax has natural air purifying properties that can help reduce indoor pollutants and allergens, making it an ideal choice for those seeking cleaner air quality in their homes.
Furthermore, the sustainability of beeswax candles is notable due to the eco-friendly nature of beekeeping practices and the production of beeswax. Beekeepers prioritize the health and well-being of their honeybee colonies, promoting biodiversity and supporting pollination efforts essential for agriculture.
By investing in beeswax candles, you are not only choosing a sustainable option but also supporting local beekeepers and their crucial role in maintaining healthy ecosystems. In conclusion, candle making with beeswax offers a holistic approach to lighting up your space while promoting environmental responsibility, health benefits, and sustainable practices that benefit both people and planet alike.
Frequently Asked Questions
Can You Make Candles With Just Beeswax?
Yes, it is absolutely possible to make candles using just beeswax. Beeswax is a natural substance that comes from honeybees and is commonly used in candle-making due to its clean-burning properties. When melted and combined with a wick, beeswax can create beautiful and aromatic candles without the need for additional ingredients.
What Are the Disadvantages of Beeswax Candles?
Despite their numerous advantages, beeswax candles also come with a few disadvantages. One of the main drawbacks is the cost – beeswax is typically more expensive than other candle-making materials, such as paraffin or soy wax.
Additionally, beeswax candles tend to have a higher melting point, which can lead to uneven burning if not properly cared for. Lastly, some people may have allergies to bee products, making beeswax candles unsuitable for them.
Is Beeswax Good for Candles?
Beeswax is considered an excellent choice for making candles due to its many benefits. Not only does beeswax burn cleanly and release a subtle honey-like fragrance when lit, but it also has natural air-purifying properties that can help improve indoor air quality.
Beeswax candles are long-lasting and drip less compared to other types of candles, making them a popular choice for those looking for a high-quality candle option.

Welcome to my candle making blog! In this blog, I will be sharing my tips and tricks for making candles. I will also be sharing some of my favorite recipes.


