When it comes to creating a relaxing ambiance and adding a touch of charm to any space, soy teacup candles are a popular choice for DIY enthusiasts. The process of making soy teacup candles allows for personalization and creativity while also offering a unique way to repurpose old teacups.
By using soy wax, fragrance oils, wicks, and other simple materials, you can craft your own signature candles that not only look elegant but also provide a clean and long-lasting burn.
Soy teacup candles have gained popularity among crafters and candle lovers for several reasons. Not only are they environmentally friendly due to the use of natural soy wax, but they also offer a cleaner burn compared to traditional paraffin candles.
The charming aesthetic of teacups adds a vintage touch to the candles, making them perfect for gifting or as decorative pieces in your own home. Additionally, the process of making soy teacup candles is relatively easy and can be customized according to your preferred scents and design preferences.
In this article, we will delve into the art of making soy teacup candles, providing detailed instructions on selecting materials, step-by-step guides on the candle-making process, tips on choosing the right teacup, exploring different fragrance options, ideas for decorating and customizing your candles, as well as important safety precautions to ensure a seamless candle-making experience.
Whether you’re a seasoned crafter or just starting out in DIY candle making, creating soy teacup candles is a delightful and rewarding project that anyone can enjoy.
Materials Needed
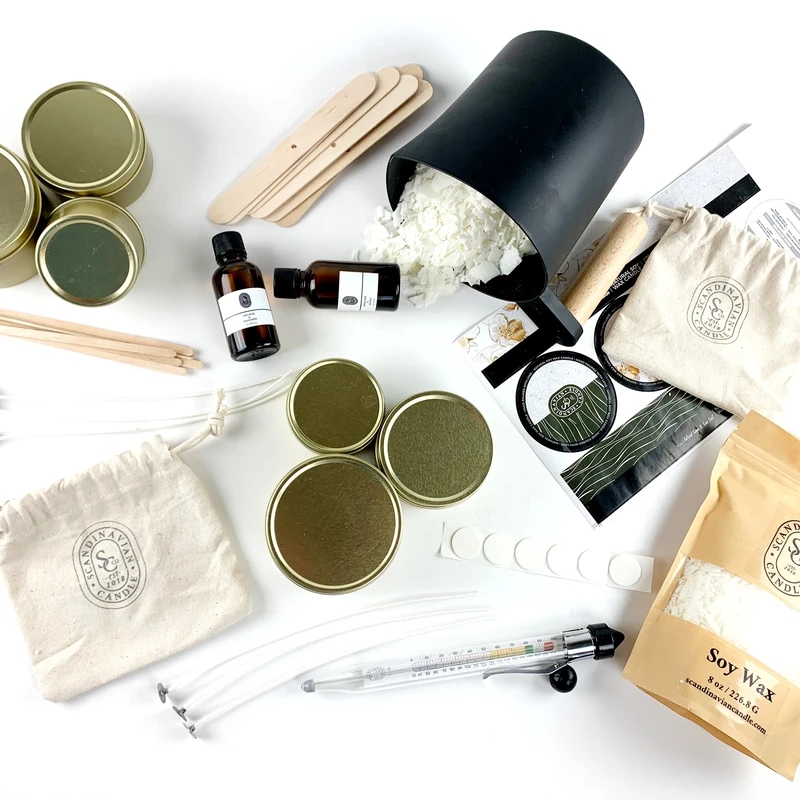
When it comes to making soy teacup candles, having the right materials is essential to ensure a successful and enjoyable candle-making experience. To embark on this DIY project, gather the following supplies: soy wax, fragrance oils, wicks, teacups, a double boiler or microwave-safe container for melting wax, a thermometer, stirring utensils, a heat-resistant surface for pouring, and any desired decorations for customizing your candles.
Soy wax is the preferred choice for making teacup candles due to its clean-burning properties and environmentally-friendly nature. Unlike paraffin wax, soy wax is derived from soybeans and does not release harmful toxins when burned.
Look for high-quality soy wax flakes that are specifically designed for candle making to ensure optimal results. Additionally, select fragrance oils that are safe for use in candles and blend well with soy wax to create a captivating aroma in your teacup candles.
Choosing the right wicks for your soy teacup candles is crucial as they determine how well your candles burn. Opt for cotton wicks that are lead-free and sized appropriately for the diameter of your teacups. Wicks that are too small may not create a sufficiently hot flame to melt the soy wax completely, while wicks that are too large can cause smoking and uneven burning.
It’s also important to select teacups that are heat-resistant and suitable for holding hot liquids to ensure safety while burning your candles. By gathering all these essential materials, you’ll be well on your way to creating beautiful and fragrant soy teacup candles that will delight both yourself and others.
Step-by-Step Instructions
To start making soy teacup candles, you will need to gather all the necessary supplies. Here is a list of materials needed for this DIY project:
- Soy wax flakes
- Teacups
- Double boiler or microwave-safe container
- Fragrance oils or essential oils
- Candle wicks
- Stirring utensil (such as a wooden dowel or spoon)
- Thermometer
- Pouring pitcher
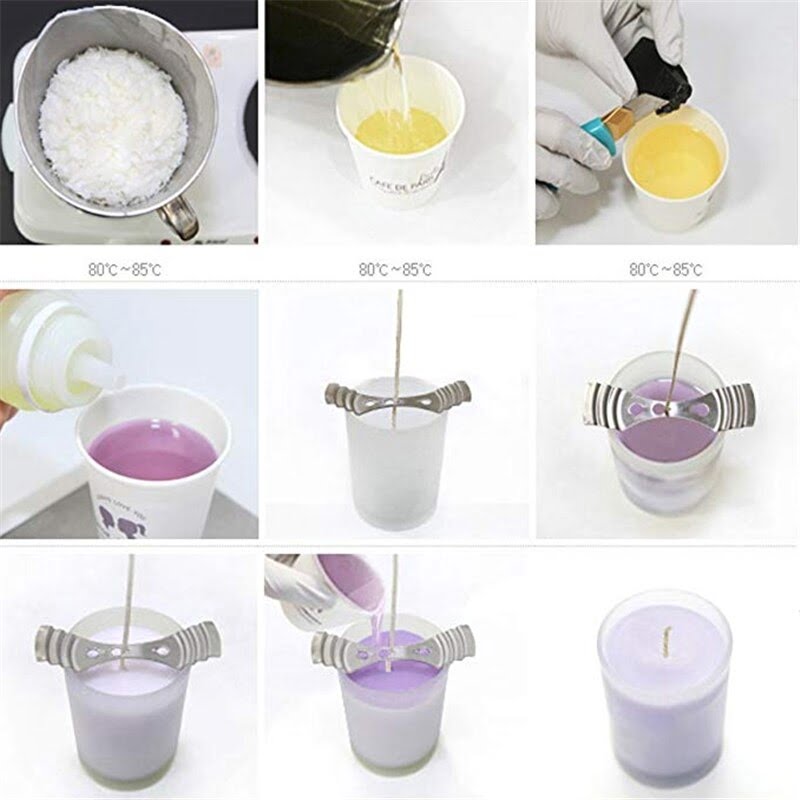
Once you have all your materials on hand, it’s time to begin the candle-making process. Follow these step-by-step instructions to create your own charming soy teacup candles:
- Prepare your work area by laying down newspaper or a disposable tablecloth to catch any spills.
- If using a double boiler, fill the bottom pot with water and place it over medium heat. Add soy wax flakes to the top pot and melt them slowly, stirring occasionally until fully melted. If using a microwave-safe container, melt the soy wax in short intervals, stirring in between each one.
- Once the wax is completely melted, let it cool slightly before adding fragrance oils according to the manufacturer’s instructions. Stir gently to ensure the fragrance is evenly distributed throughout the wax.
These simple steps will guide you through creating beautiful and aromatic soy teacup candles that you can enjoy or gift to others. Experiment with different fragrances and decorative elements to personalize your creations and make them truly unique. Enjoy the process of making soy teacup candles and bask in the warm glow they bring to any space.
Choosing the Right Teacup
When it comes to making soy teacup candles, the choice of teacup plays a significant role in the overall aesthetic and functionality of the final product. Selecting the right teacup is crucial for ensuring that your candles burn evenly and safely. Size, shape, and material are all important considerations when choosing a teacup for your candles.
Size Matters
The size of the teacup you choose will determine the amount of wax needed to fill it and ultimately the burn time of your candle. You want to make sure that the teacup is big enough to hold an adequate amount of wax but not too large that it overwhelms the space or leaves excess wax behind after burning.
Shape and Style
The shape of the teacup can also impact how your candle burns. Teacups with wider openings may allow for better air circulation, resulting in a cleaner burn. Additionally, consider the style of the teacup – whether you prefer a vintage look with intricate designs or a more modern and sleek appearance.
Material Considerations
The material of the teacup can affect both the appearance and safety of your candle. Porcelain or ceramic teacups are popular choices as they can withstand high temperatures without cracking. Avoid using delicate materials like glass or thin plastic that may not be able to handle the heat generated by burning candles. Ultimately, selecting a teacup that is both visually appealing and functional will enhance the overall experience of making soy teacup candles.
Scent Selection
Soy teacup candles are not only a delightful addition to your home decor but also offer a soothing aroma that can elevate your space. When it comes to making soy teacup candles, choosing the right fragrance is a crucial step in creating a unique and personalized product.
There is a wide array of fragrance options available, ranging from floral and fruity scents to warm and earthy notes. It’s essential to consider the ambiance you want to create with your candles and select fragrances that align with your preferences.
One popular option for scenting soy teacup candles is using essential oils, which not only provide aromatic benefits but also have therapeutic properties. Essential oils extracted from plants like lavender, citrus, eucalyptus, or peppermint can add a refreshing and calming touch to your candles.
Additionally, you can blend different essential oils to create custom scent combinations that resonate with your mood and style. Experimenting with various essential oil blends allows you to tailor the fragrance of your soy teacup candles according to different seasons or occasions.
In addition to essential oils, fragrance oils are another great choice for adding captivating scents to your soy teacup candles. Fragrance oils come in an extensive range of options, from traditional vanilla and cinnamon scents to exotic tropical fruit blends and cozy autumn aromas.
These oils are specifically formulated for candle making and provide a strong and long-lasting scent throw when used in soy wax candles. By exploring different fragrance oil combinations and concentrations, you can design soy teacup candles that not only look beautiful but also envelop your space in enchanting aromas that reflect your personality.
| Soy Teacup Candle Fragrance Options | Benefits |
|---|---|
| Essential Oils | Therapeutic properties; customizable blends |
| Fragrance Oils | Wide variety of scents; strong scent throw |
Decorating and Customizing
Dried Flowers
Dried flowers can add a touch of elegance and natural beauty to your soy teacup candles. You can place dried flowers on top of the melted wax before it hardens or embed them within the candle for a botanical surprise as it burns. Popular choices include lavender buds, rose petals, or chamomile flowers. Make sure to use dried flowers that are safe for candle making and won’t catch fire.
Glitter
For those who love a bit of sparkle, adding glitter to your soy teacup candles can create a whimsical and magical effect. You can sprinkle glitter on top of the wax before it solidifies or mix it into the melted wax for an all-over shimmer. Choose biodegradable glitter options to make your candles eco-friendly while still achieving that dazzling look.
Labels
Creating custom labels for your soy teacup candles can give them a professional and personalized touch. You can design labels with the name of the scent, ingredients used, or even a special message for gift-giving occasions. Print labels on adhesive paper or get creative with hand-lettering directly onto the teacups. Labels not only add a decorative element but also provide important information about the candle.
By incorporating these decorating and customizing ideas into your soy teacup candles, you can elevate their visual appeal and make them stand out as both decorative pieces and functional light sources in your home. Get creative and experiment with different combinations of embellishments to find what suits your style best when making soy teacup candles.
Curing and Storage
Curing your soy teacup candles is a crucial step in the candle-making process that should not be overlooked. Curing allows the candle to develop its full fragrance potential and ensures a longer, cleaner burn time. Properly cured candles will have better hot throw, meaning the scent will disperse more effectively when the candle is lit. To effectively cure your soy teacup candles, follow these steps:
- Place newly made candles in a cool, dark area with good ventilation.
- Allow the candles to cure for at least 2-3 days before lighting them.
- Ensure that the candles are stored away from direct sunlight and heat sources to prevent melting or warping.
Proper storage of your soy teacup candles is essential to maintain their quality and extend their lifespan. Here are some tips on how to store your candles properly:
- Avoid storing candles in humid or damp areas as this can affect the consistency of the wax.
- Keep candles away from drafts or air conditioning vents, as this can cause uneven burning.
- If you plan to store your soy teacup candles for an extended period, wrap them in plastic or place them in sealed containers to prevent dust and dirt buildup on the surface.
By taking the time to properly cure and store your soy teacup candles, you can enjoy their beautiful fragrances and ambiance for a longer period. Remember that proper handling and care of your homemade candles will enhance your overall candle-making experience and ensure optimal performance when you decide to light them up.
Safety Precautions
When it comes to making soy teacup candles, safety should always be a top priority. Following proper safety measures not only ensures a successful DIY candle-making experience but also protects you from any potential hazards. One crucial safety precaution to keep in mind is using a double boiler for melting wax.
This method helps prevent the wax from overheating and reduces the risk of accidental fires. By melting the soy wax gently and evenly, you can create high-quality candles that are safe to use.
Another essential safety measure when making soy teacup candles is ensuring proper wick placement. Placing the wick correctly in the teacup is crucial for even burning and preventing any mishaps while the candle is lit. Whether using pre-tabbed wicks or cutting your own, make sure they are securely anchored in the center of the teacup before pouring the melted wax. This simple step can make a big difference in the quality and safety of your homemade candles.
In conclusion, while making soy teacup candles can be a fun and rewarding craft, it’s important to prioritize safety throughout the process. By following key safety precautions like using a double boiler for melting wax and ensuring proper wick placement, you can enjoy creating beautiful candles without compromising on safety.
So gather your materials, select your favorite teacups, choose a delightful scent, and embark on the journey of making soy teacup candles – all while keeping safety at the forefront of your DIY candle-making adventure.
Frequently Asked Questions
Can You Make Candles in a Teacup?
Making candles in a teacup is certainly possible and can actually be quite charming! The process involves melting wax, adding fragrance or color if desired, setting the wick in place, and then pouring the wax carefully into the teacup. Once the wax hardens, you have a unique and cozy candle ready to use.
What Is the Best Wax for Teacup Candles?
When it comes to choosing the best wax for teacup candles, soy wax is often a popular choice. Soy wax burns cleanly and slowly, allowing for a longer-lasting candle. Additionally, soy wax can hold fragrance oils well, providing a lovely scent experience when the candle is lit.
What Size Wick for a Teacup Candle?
Selecting the right size wick for a teacup candle is crucial to ensure proper burning. It’s recommended to choose a smaller-sized wick for teacup candles since they have less space than larger containers.
A wick that is too large can cause the candle to burn too fast or unevenly, leading to wasted wax or potential safety hazards. Testing different wick sizes before making a batch of teacup candles can help determine the best option for your specific cup size and chosen wax.

Welcome to my candle making blog! In this blog, I will be sharing my tips and tricks for making candles. I will also be sharing some of my favorite recipes.

